Can I use Qt Creator without Qt?

Qt Creator... the best IDE for developing C and C++ I've ever seen in my life. Since I like it that much, I'm sharing some of what I know about it. DISCLAIMER: I'm not a lawyer, so don't hold me liable for anything I say here about licensing. Anything you do is your own responsibility. 

What does using Qt Creator without Qt mean?

It simply means that you don't have to install or use the Qt libraries, including qmake. There are many reasons why that may be the case:

  • You may have an issue with licensing since qmake is LGPL licensed
  • You may not have the possibility to install qmake alone without its whole gear, as is the case in Windows
  • You may not want to compile the whole Qt libraries if the pre-compiled versions that work with your compiler is not available

While I love Qt and use it all the time, I follow the principle of decoupling my projects from libraries if I don't use them. But since I love Qt Creator, I still want to use it! Reasons will become clear below.

What are the ingredients of this recipe?

  1. Qt Creator
  2. CMake
  3. A compiler (gcc, MinGW or Visual Studio, or anything else)

You don't need to download the whole Qt SDK. Just Qt Creator. It's about 90 MB.

Basic steps

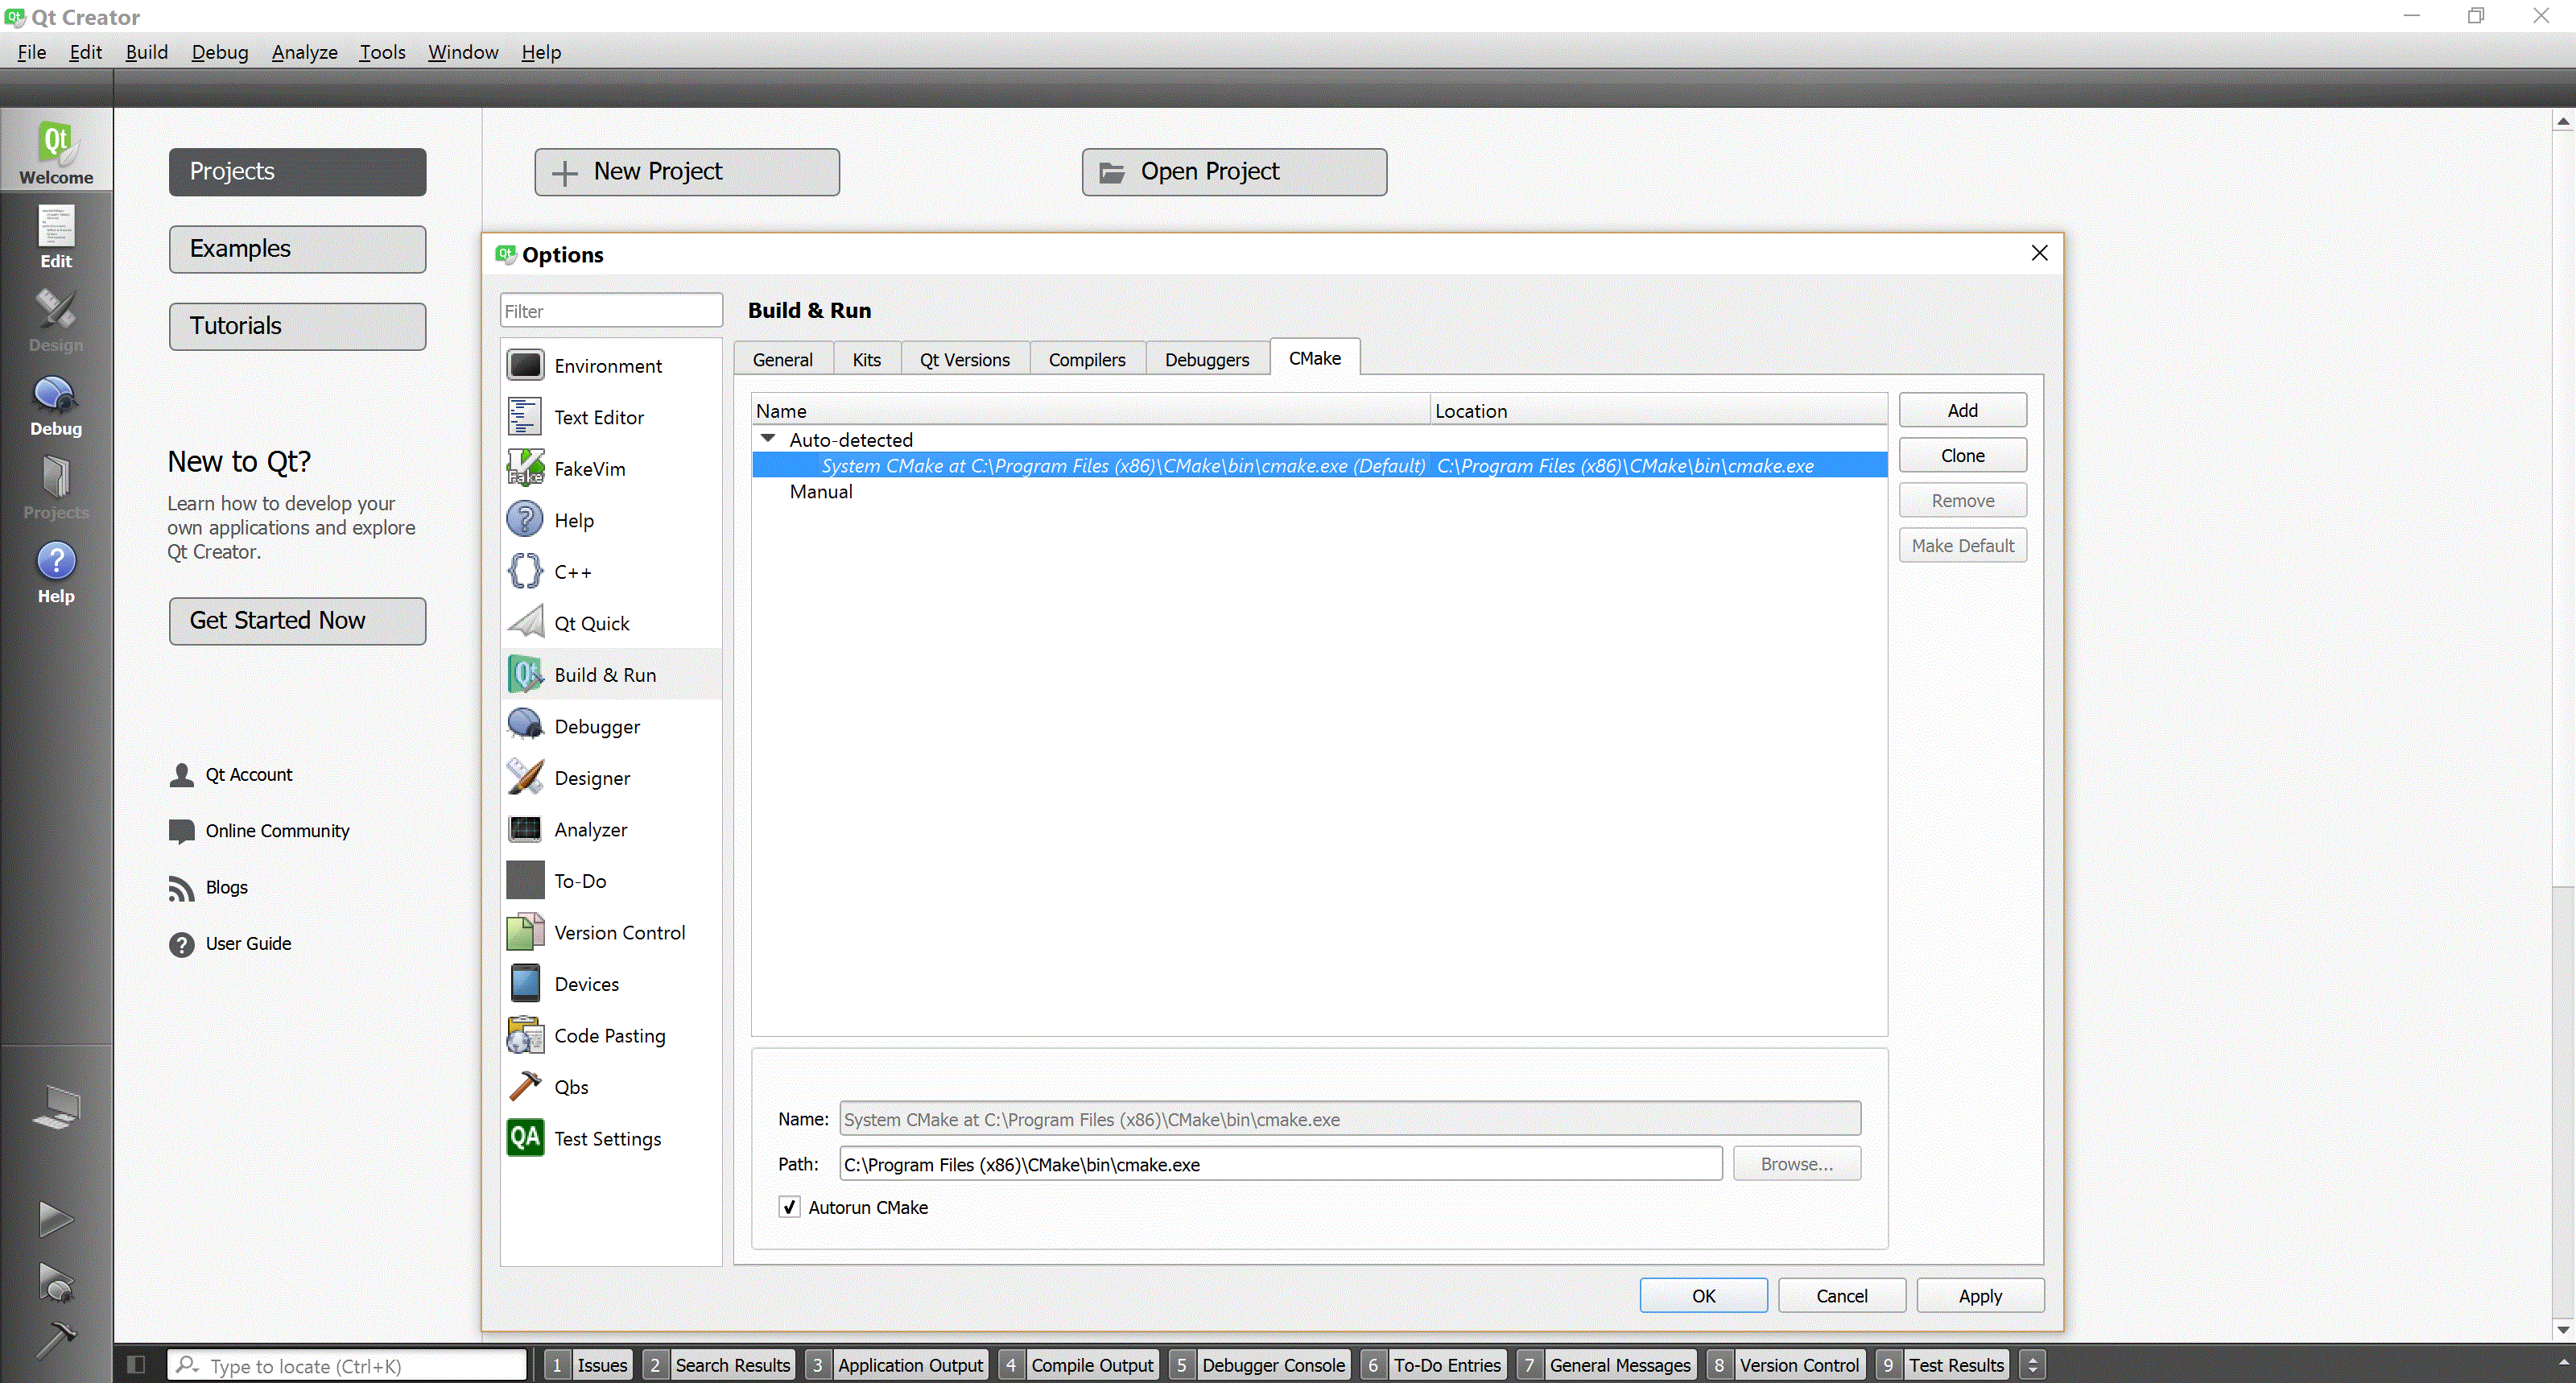
After installing the 3 ingredients, make sure that Qt Creator recognized that CMake exists on the computer. The next picture (click on it to magnify it) is how it looks like if CMake was found. If it doesn't find CMake, on Windows, most likely the reason is that you chose in the installation not to add CMake to the system's PATH. Eventually, you can just add it manually if it can't be found automatically.
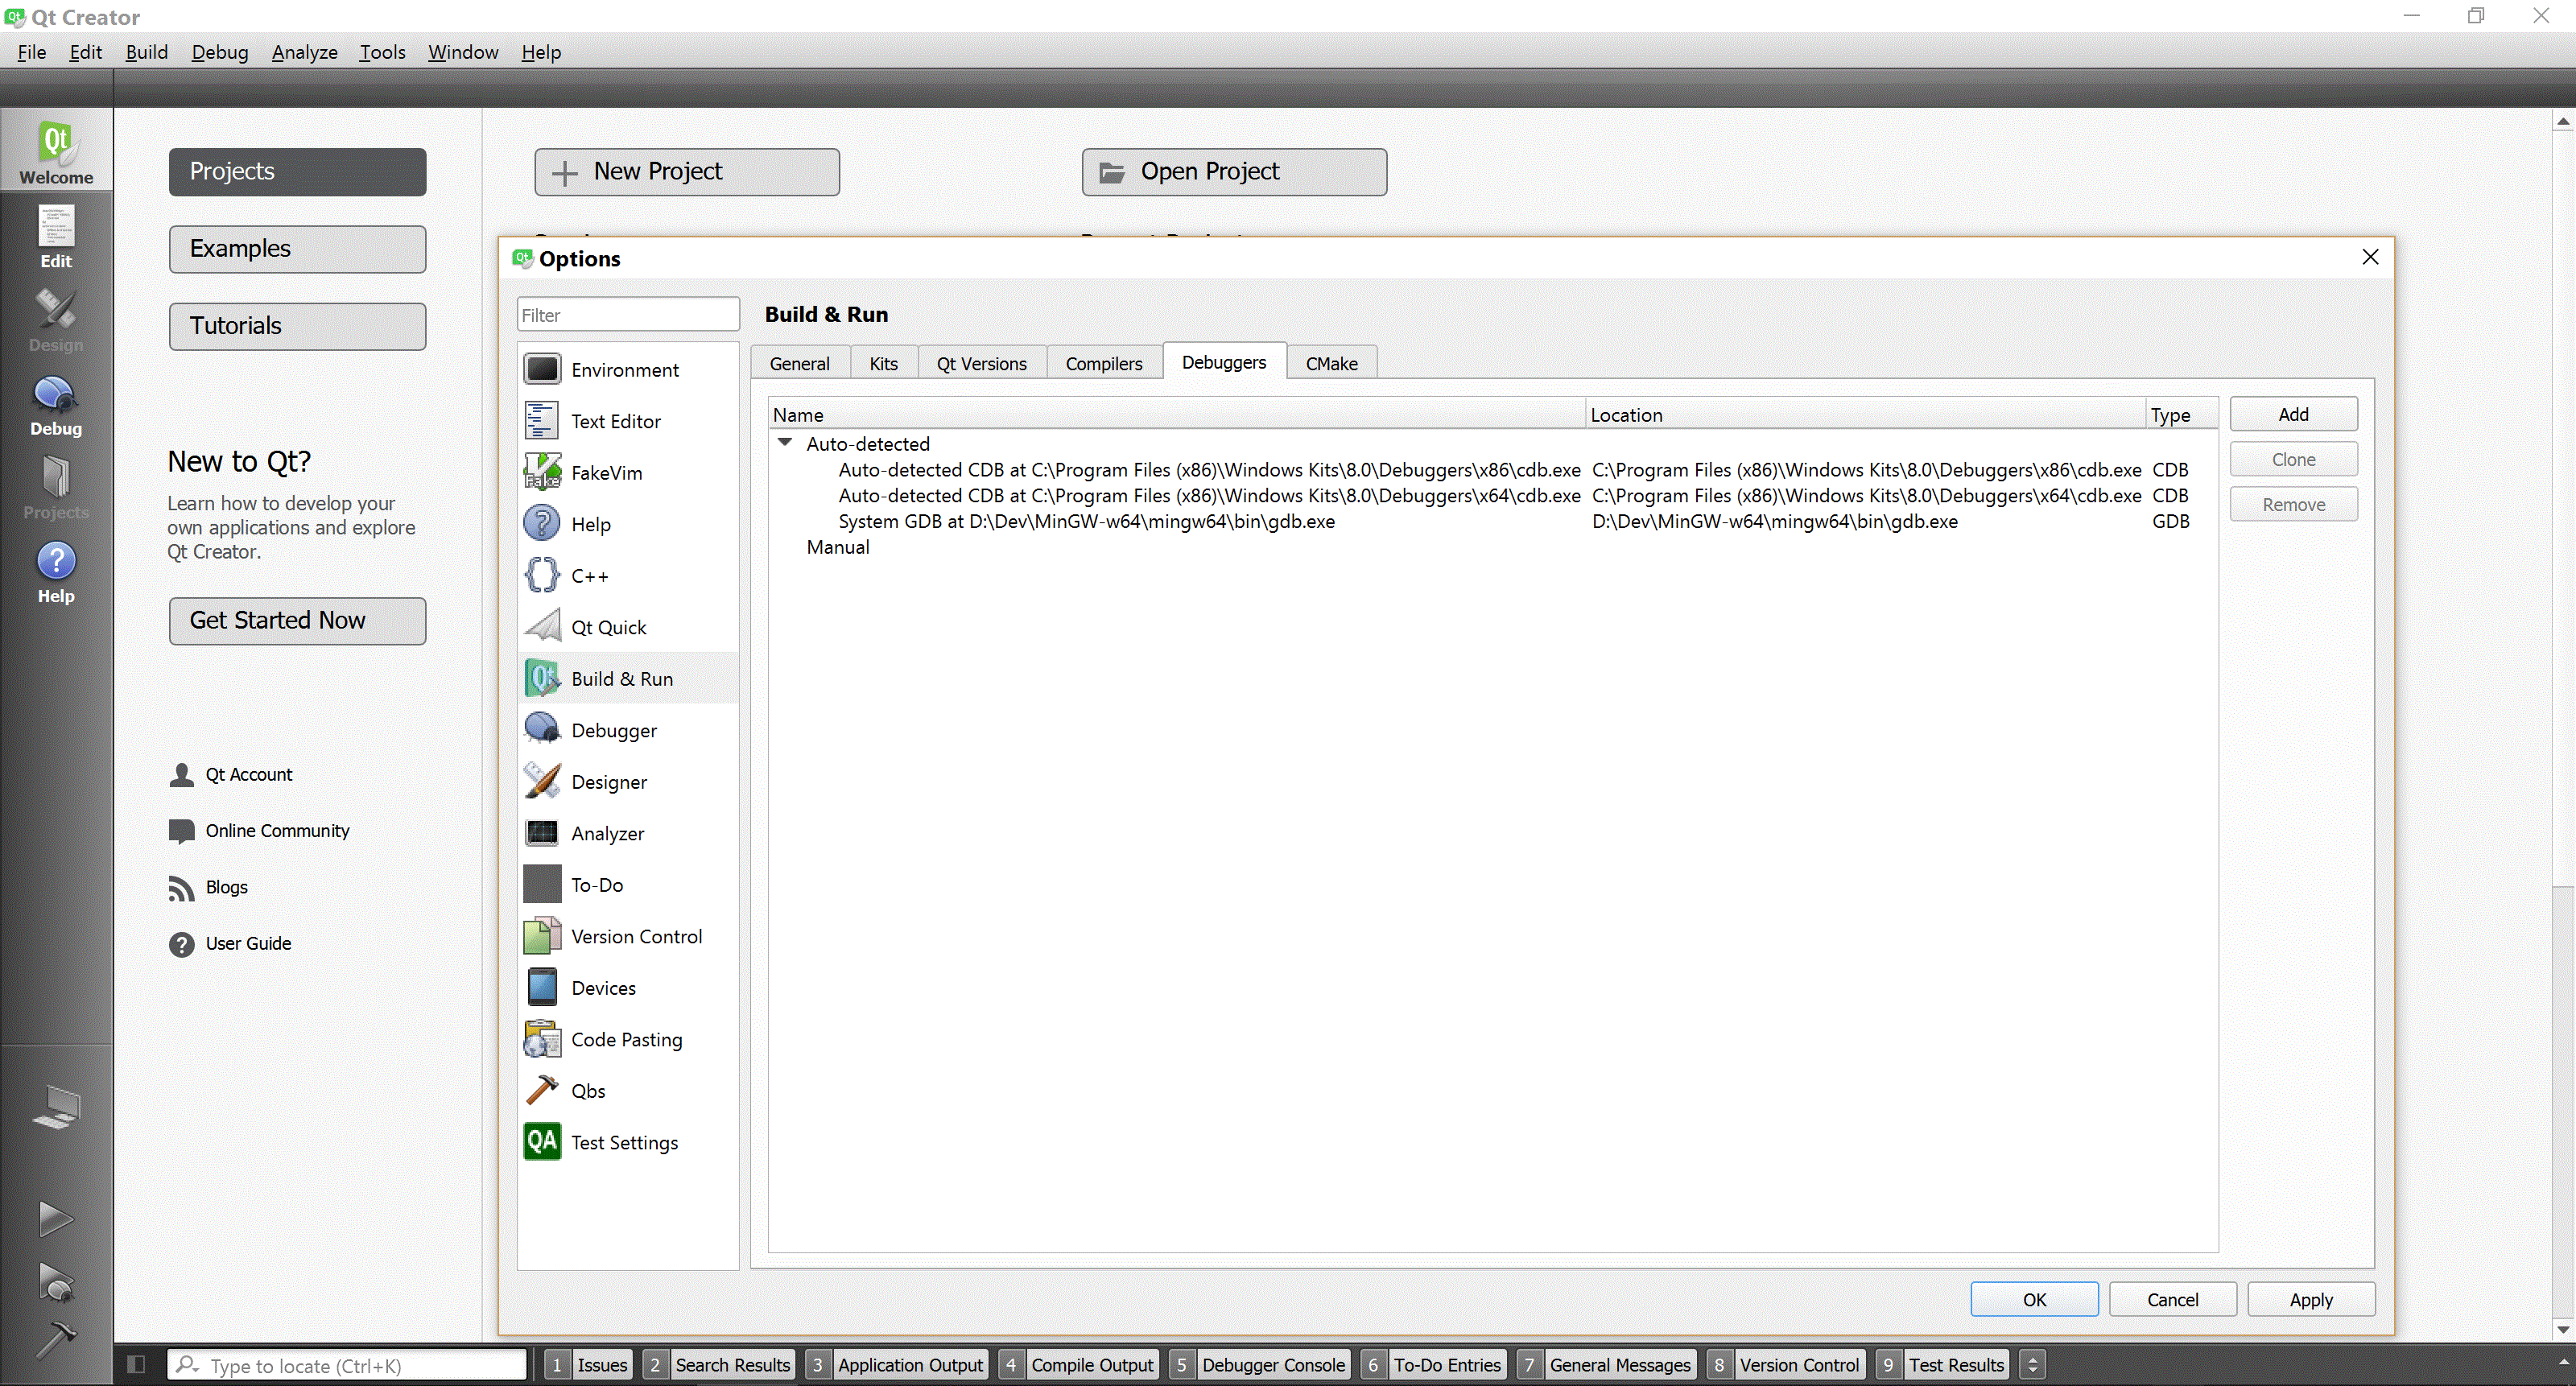
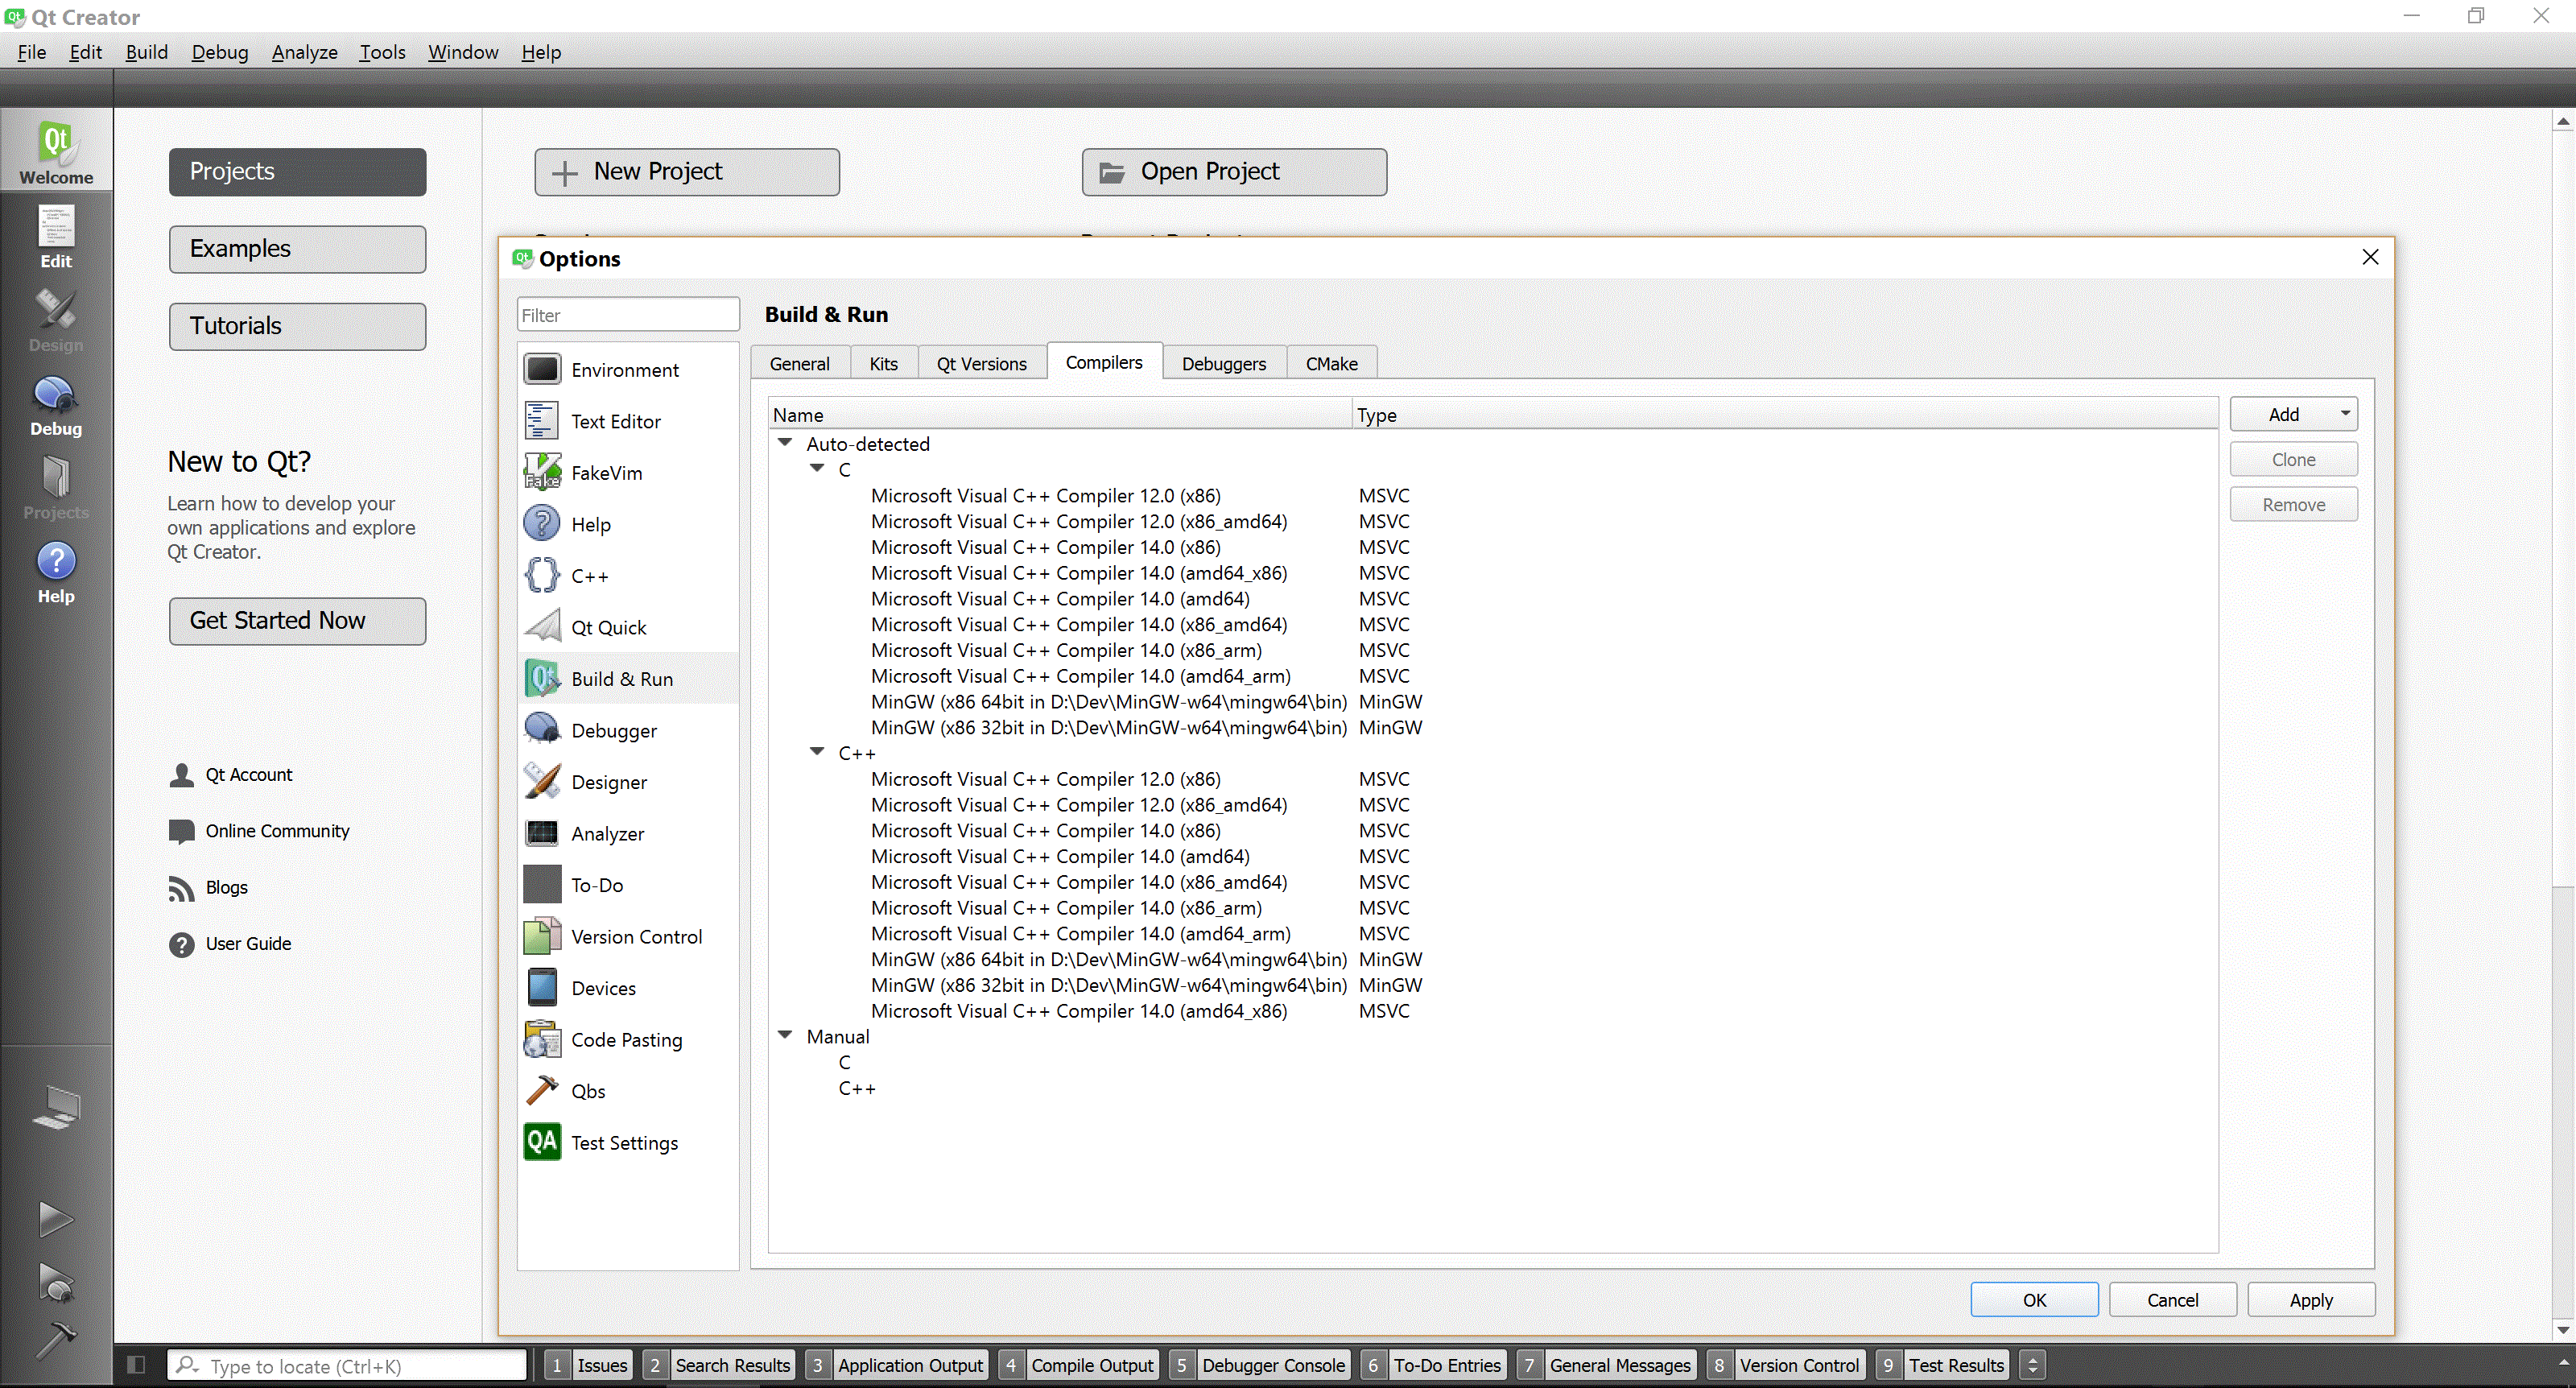
Next, make sure that Qt recognizes the compiler and the debugger as you see in the next pictures. Again, you can add them manually. For Visual Studio to be found automatically, I guess the environment variable VS140COMNTOOLS has to be defined. "140" is version 14 of Visual Studio, which is the version number of Visual Studio 2015. It's defined by default when Visual Studio is installed. For MinGW to be detected automatically, the bin of MinGW has to be in PATH.
Adding the complete tool-chain/kit

Go to the "Kits" tab. If you have Qt libraries installed and configured, you'll see them there. I don't like Qt SDK, and I usually compile my own versions of Qt. You'll see that in the next screenshot. What you see in the next screenshot are 3 kits that use Qt libraries, and another that do not. The free version of Visual Studio (2012 and later) comes with both 32-bit and 64-bit compilers. You can choose any one of them, or both (like I do). I don't use MinGW often on Windows, so I install only 1 version of it (I use MinGW on Windows primarily because it offers the "-pedantic" flag, which gives the chance to experiment with C++ standard-approved features).
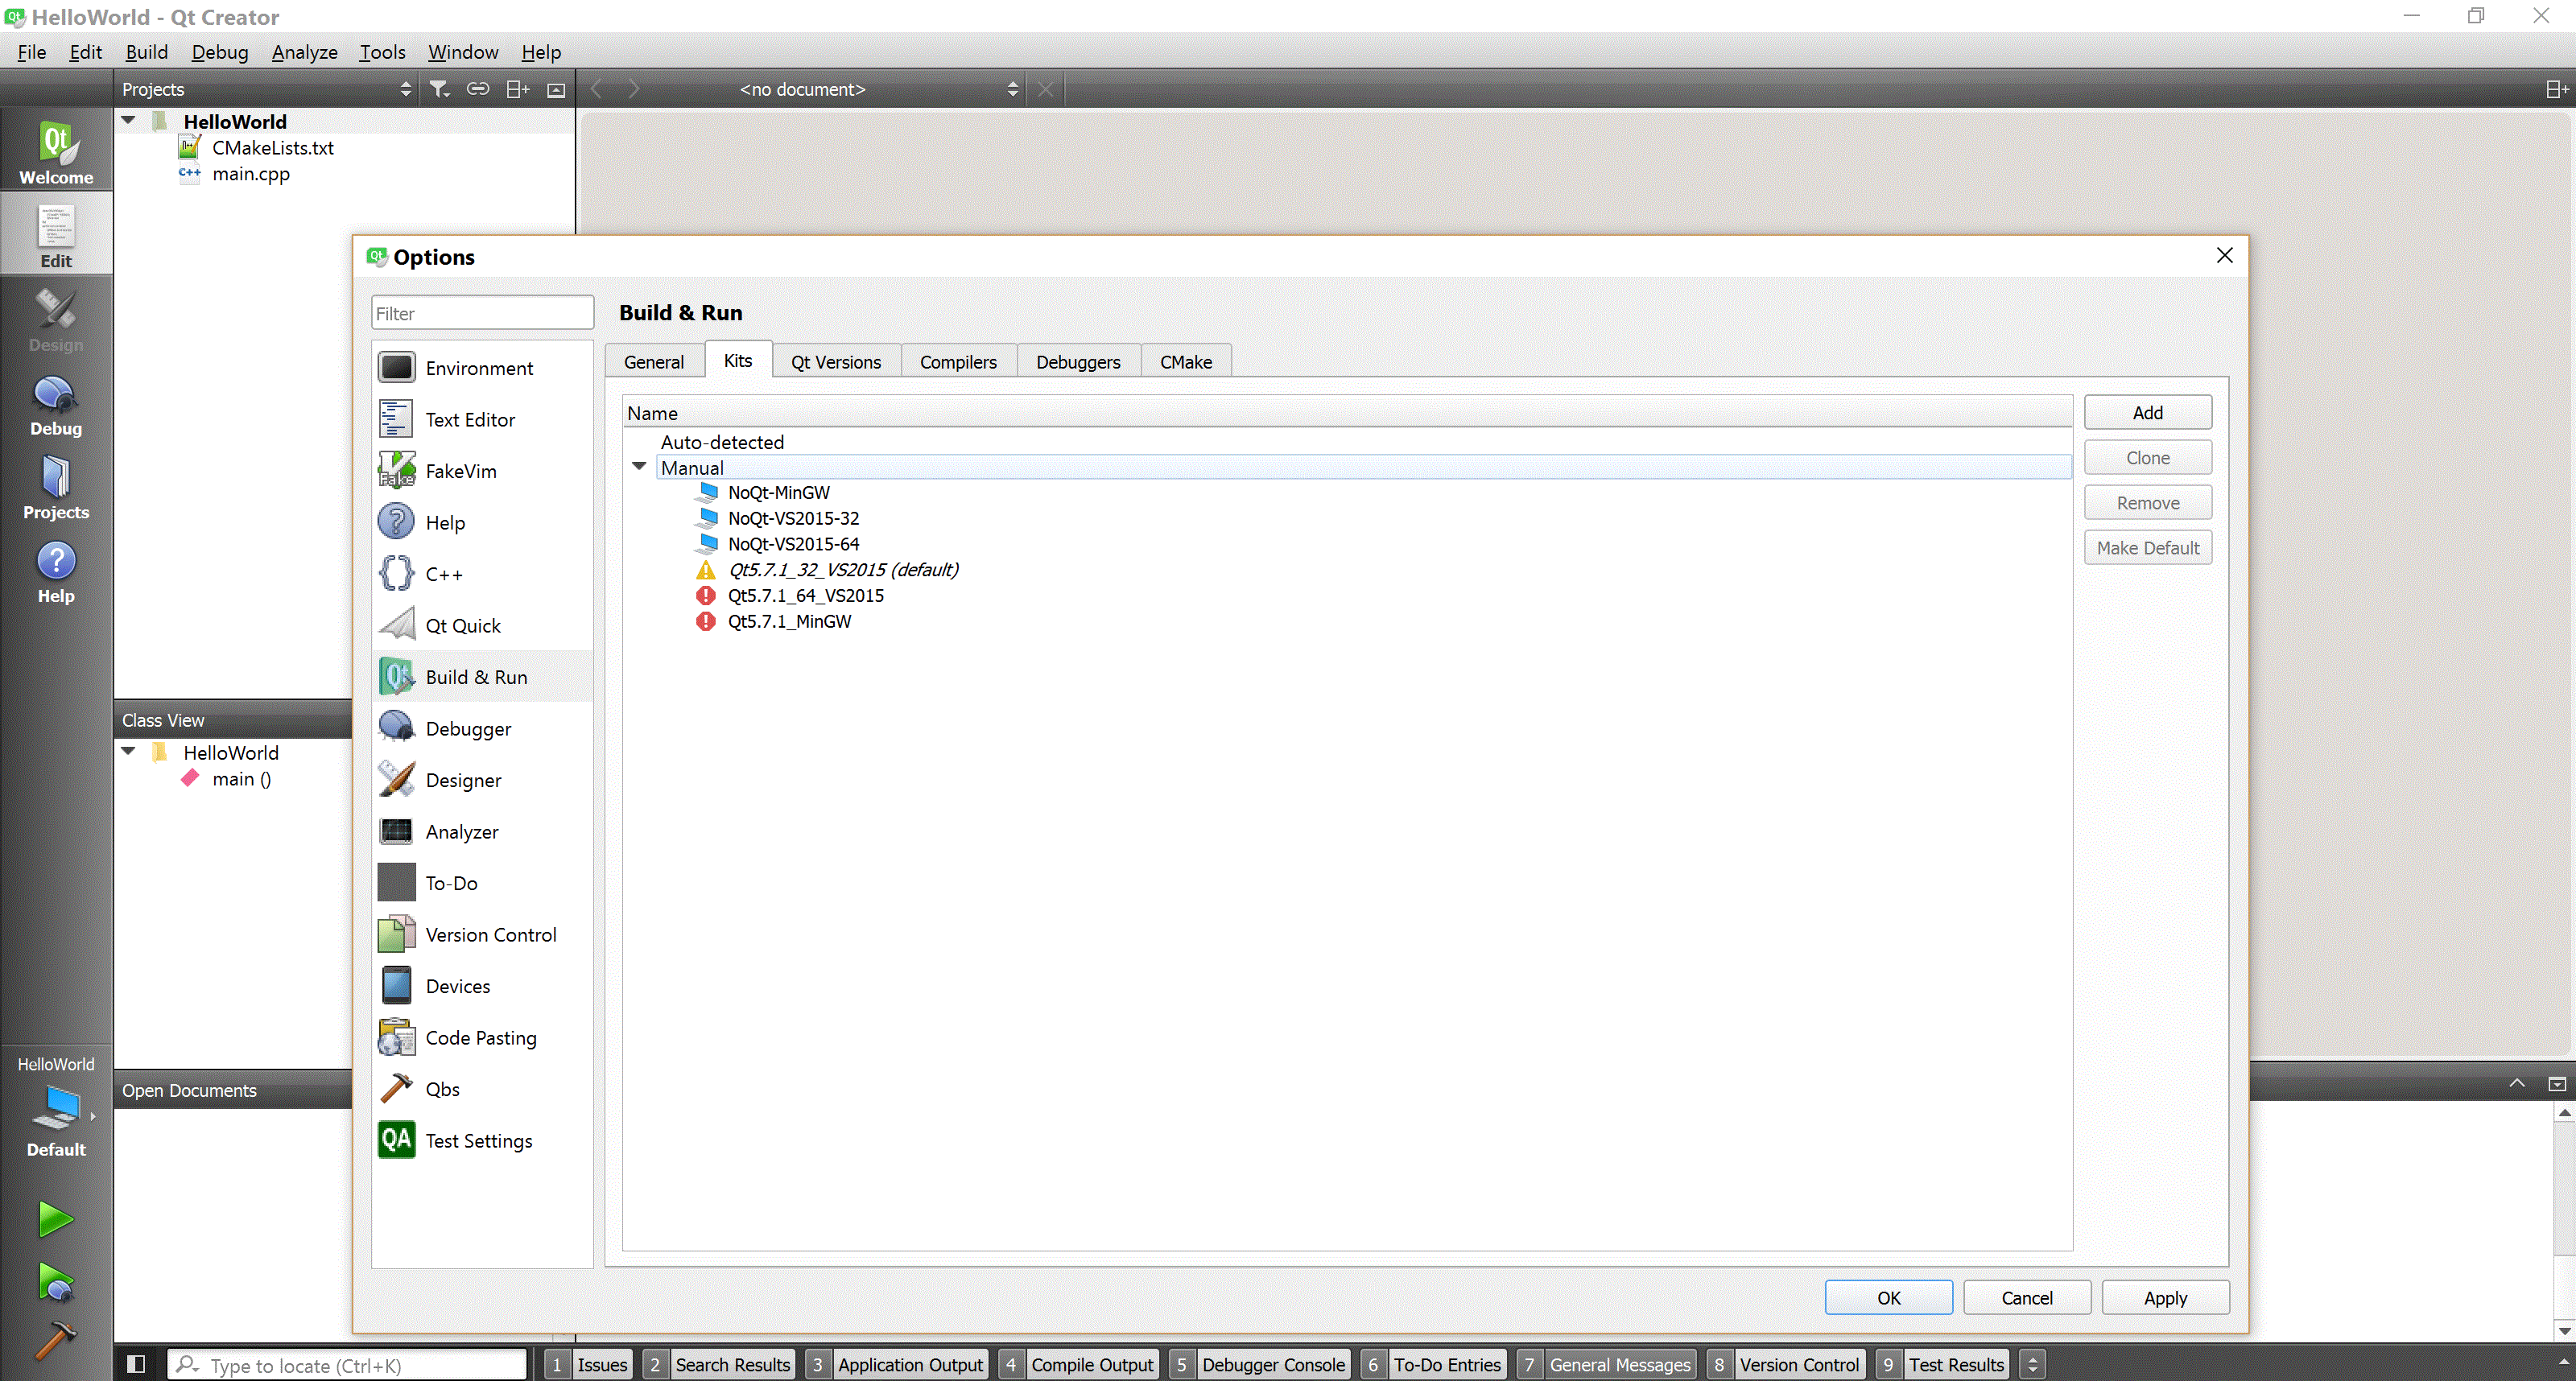
Now click "Add", and choose the fields as shown below (most importantly, configure CMake correctly, it's a little tricky, and the error on Qt Creator doesn't tell you what you did wrong) If you're getting unexplained errors when running CMake, follow the following instructions carefully

Visual Studio

The following is a screenshot of how Visual Studio configuration should look like (screenshot is for 64-bit)
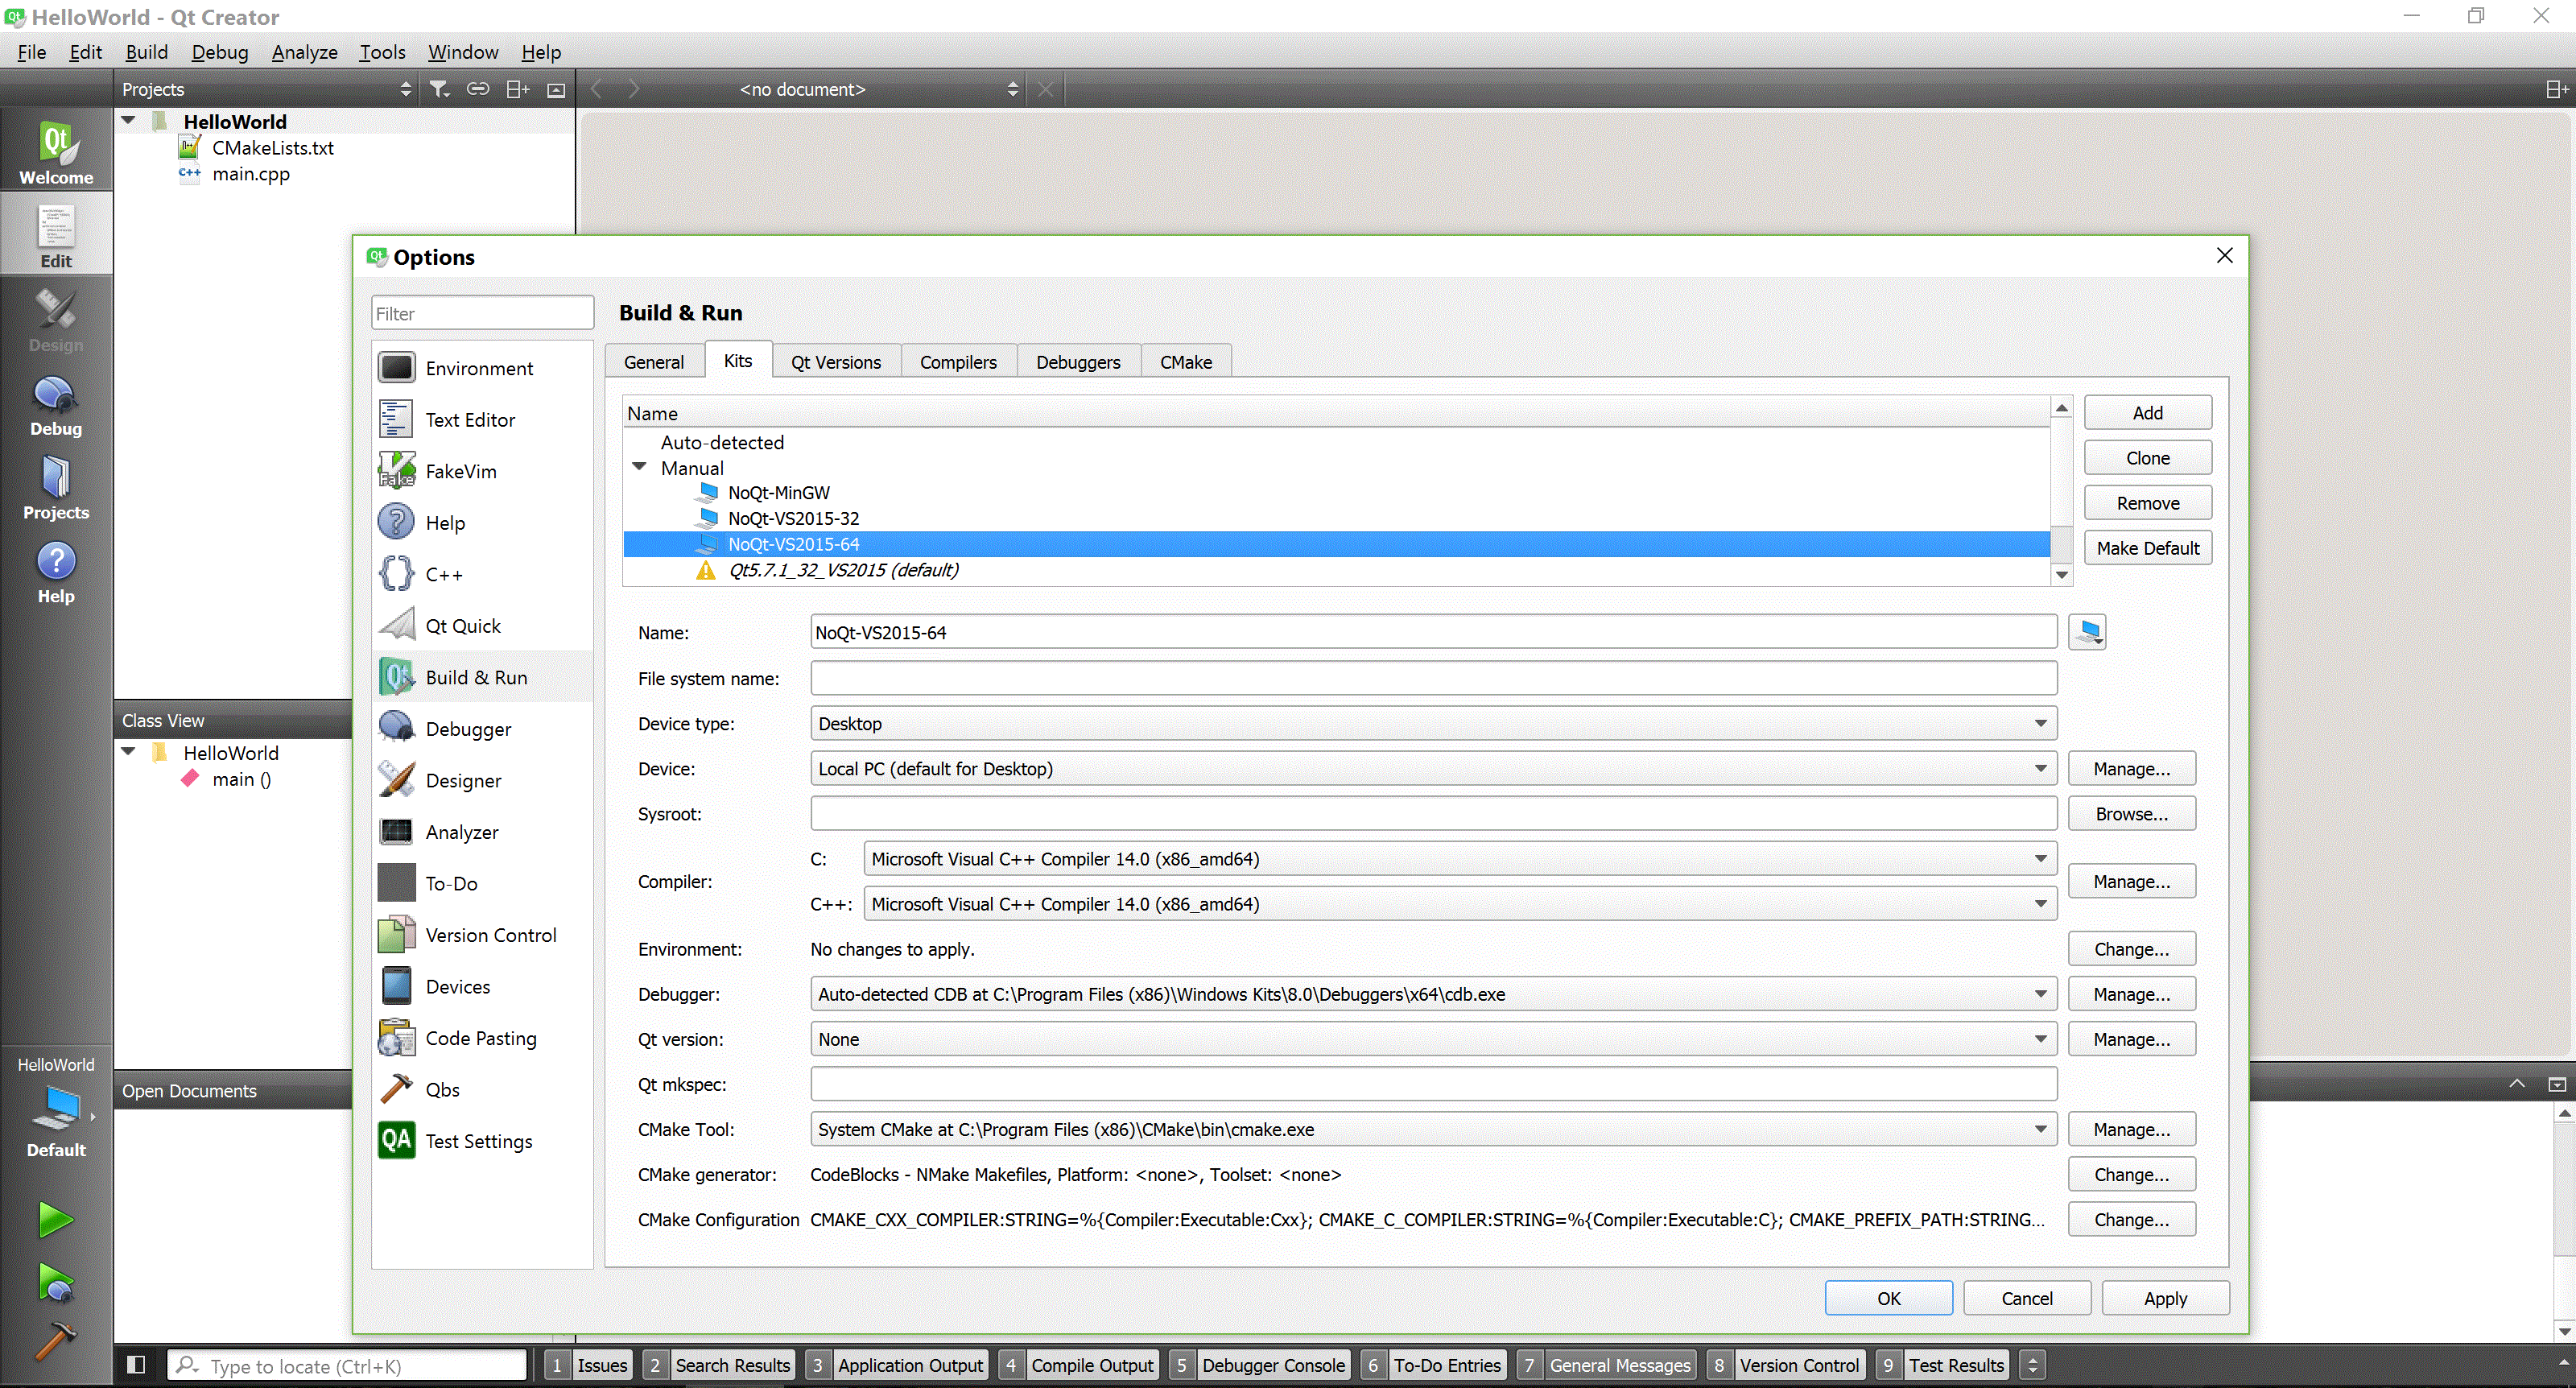
Set the following

  • For the 32-bit compiler: Choose the compiler with (x86)
  • For the 64-bit compiler: Choose the compiler with (x86_am64) or (amd64)
  • Choose "None" for Qt version
  • Choose the correct debugger
  • Most importantly: After choosing CMake from the drop-down list, make sure that CMake generator is chosen to be "NMake Makefiles", and the Extra generator to be CodeBlocks

The last piece of information is the invitation to all kinds of problems. If running CMake doesn't work, you most likely configured that part incorrectly.

MinGW

The following is a screenshot of how MinGW configuration should look like:
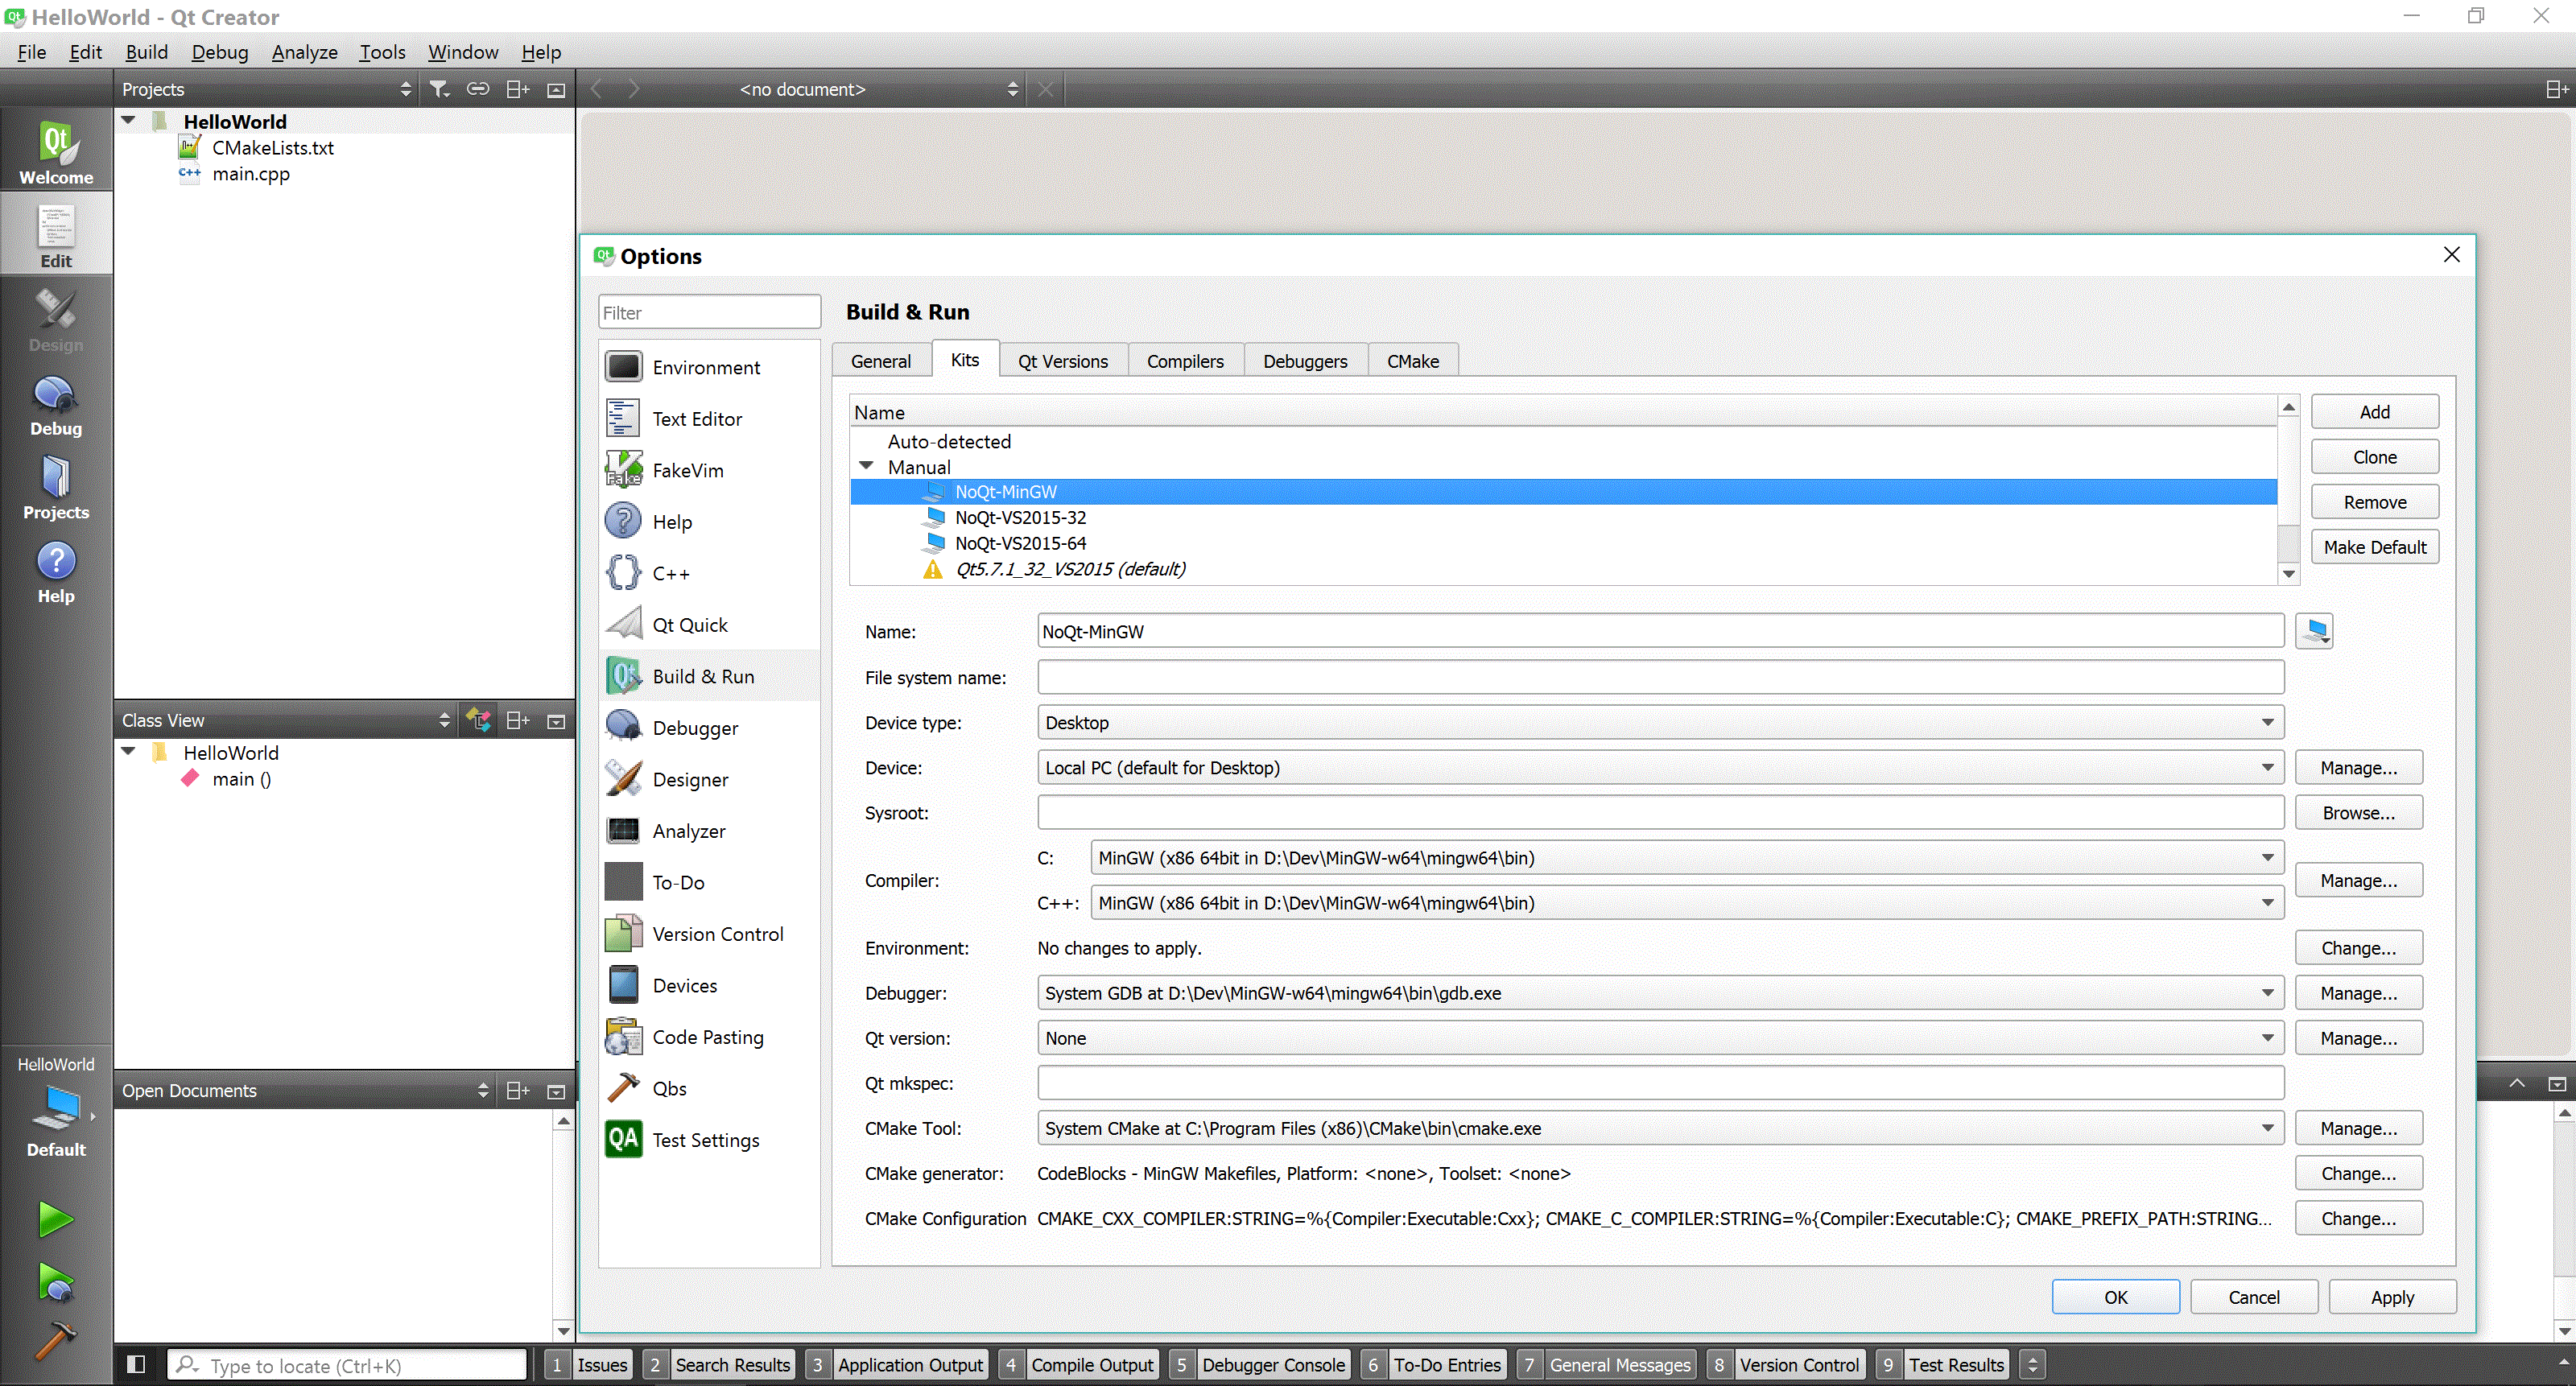
  • Choose "None" for Qt version
  • Choose the correct debugger
  • Most importantly: After choosing CMake from the drop-down list, make sure that CMake generator is chosen to be "MinGW Makefiles", and the Extra generator to be CodeBlocks

The last piece of information is the invitation to all kinds of problems. If running CMake doesn't work, you most likely configured that part incorrectly. I have to say that from my experience, Qt Creator some times fails to run CMake with MinGW with no good reason. I fix this by switching the "Extra generator" to "CodeLite", and back to "CodeBlocks". I'm currently using Qt Creator 4.2.0. It might be a bug?

gcc/g++

It's very easy to get gcc/g++ to work. The following is a screenshot:
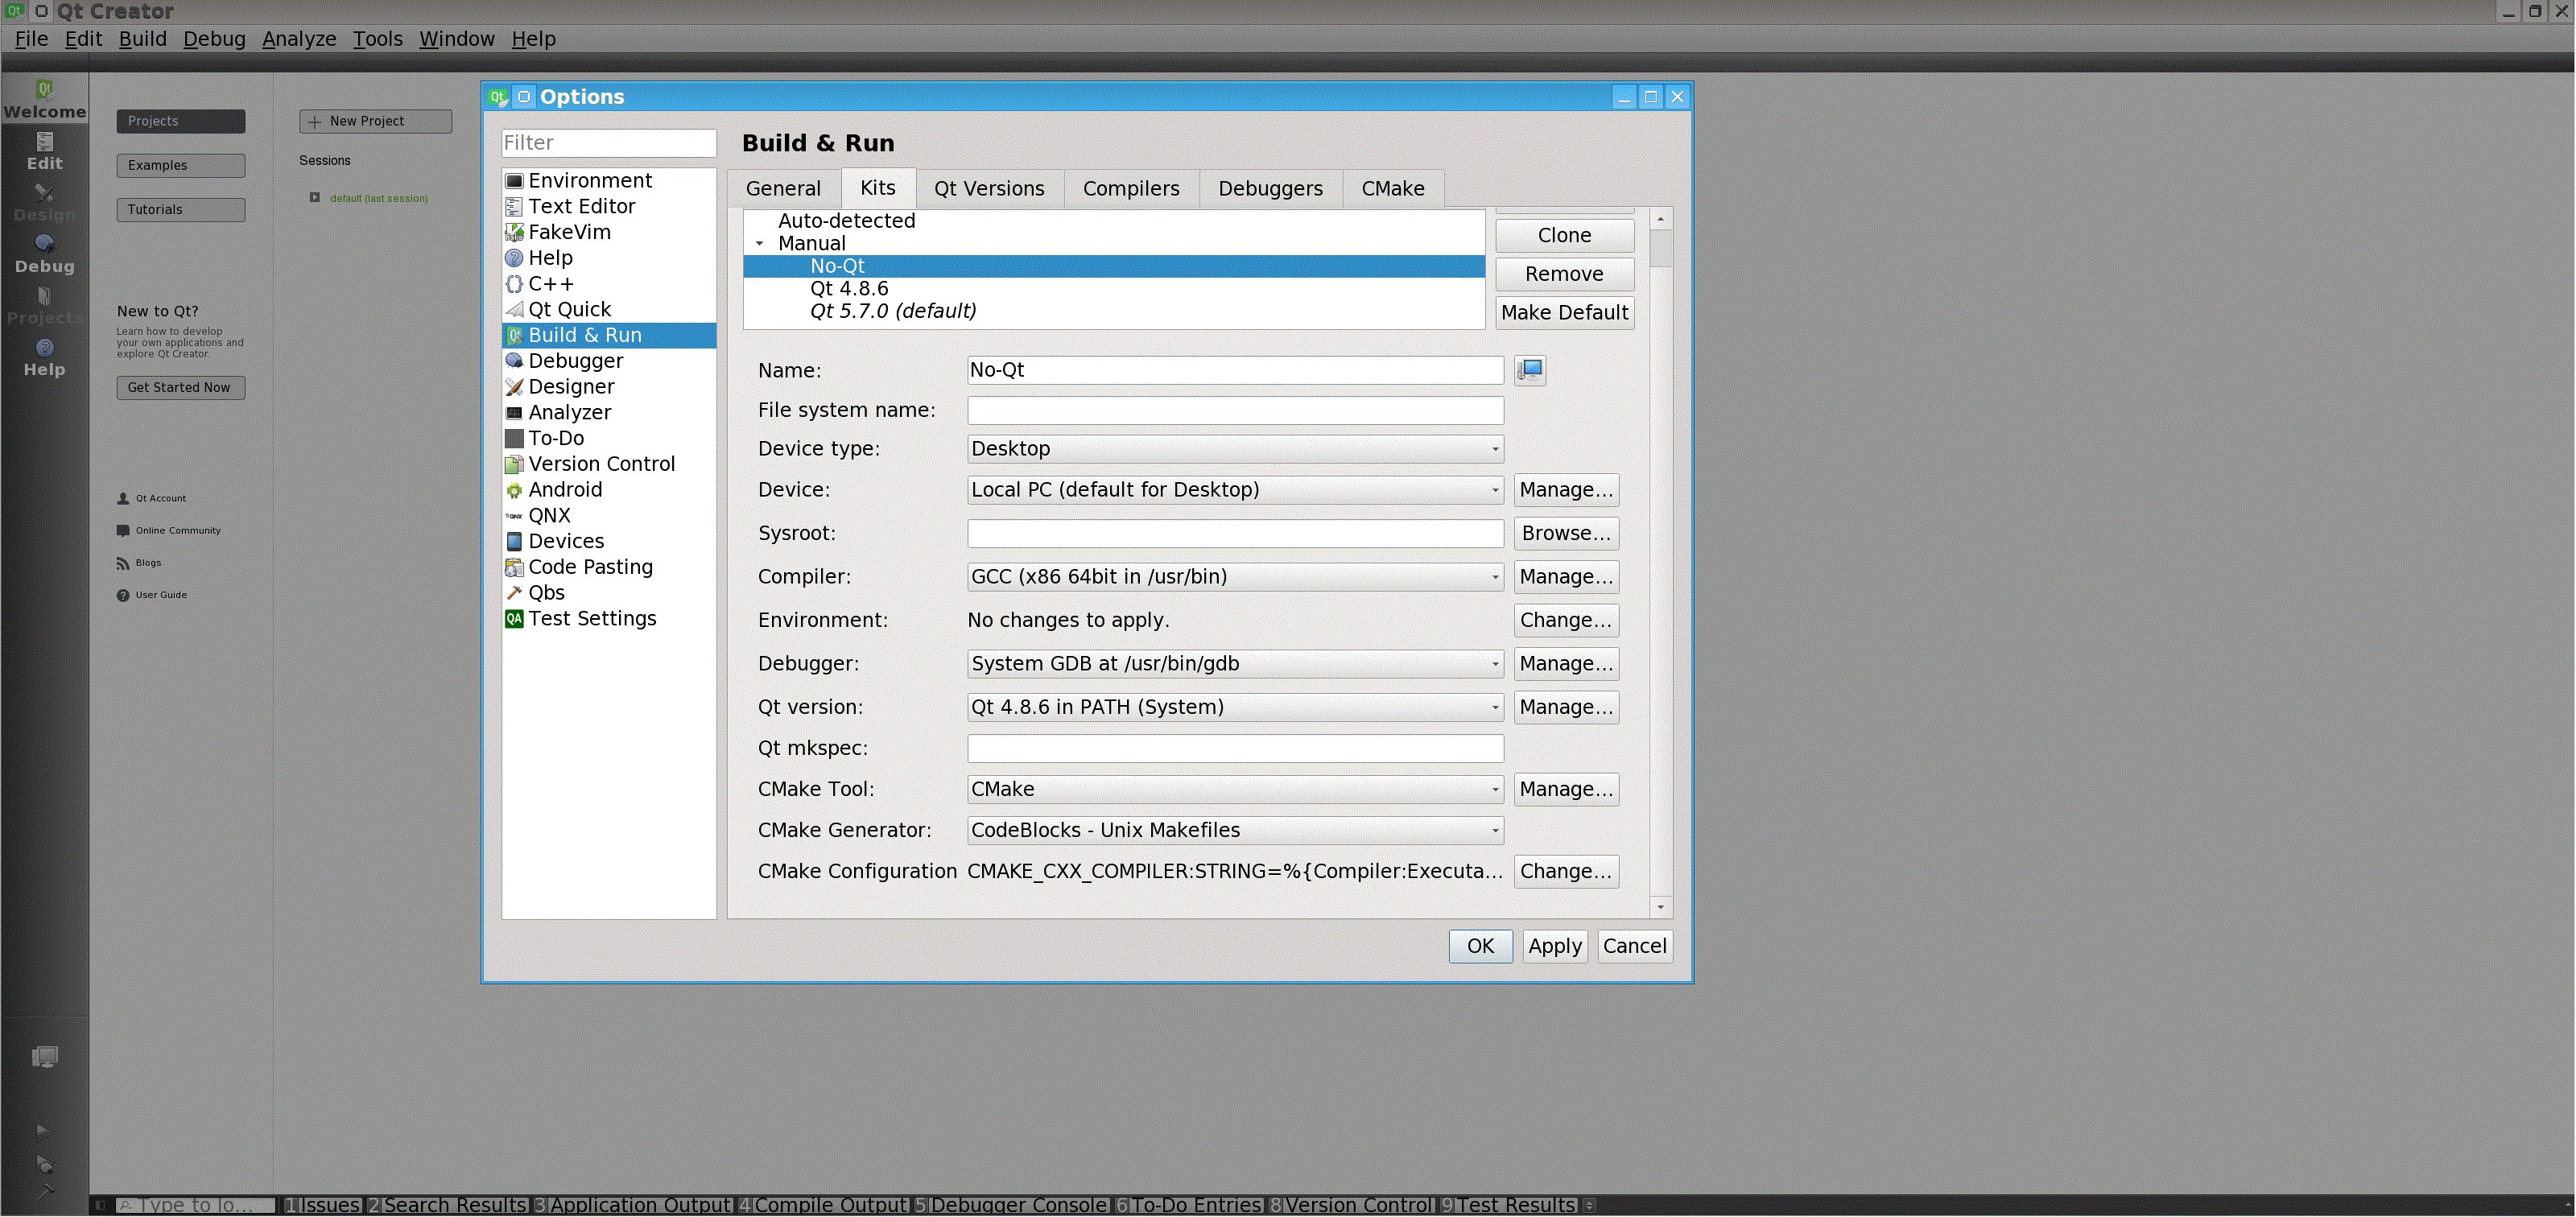
  • Choose "None" for Qt version
  • Most importantly: After choosing CMake from the drop-down list, make sure that CMake generator is chosen to be "CodeBlocks - Unix Makefiles".  It's chosen by default, so nothing to worry about.

And you're done!

What can I do with CMake + Qt Creator?

No ultimate dependence on Qt Creator!

Visual Studio solutions don't work without Visual Studio. Netbeans configuration is stored in "netbeans project directory". it's very annoying that every IDE has its own weird format! I never stop hearing people complaining about porting their programs to other systems and having problems because of this. One of the things I like most about Qt Creator is the fact that it doesn't have any special project files for itself. The Makefile itself (CMake file, in this case, or qmake otherwise) is the project file. This ensures not only 100% portability (since both make systems are cross-platform) but also independence of Qt Creator itself. In the future, if the whole Qt Creator project goes down, your project won't be affected at all.

What if I want to use Qt Creator just as an IDE without having to build a project through it?

I had the "luxury" of getting a project from a space agency to add some features to it, where they had their own build system. I wasn't able to use Qt Creator to build the project, but... But why use Qt Creator? Simply because you'll get

  • Syntax highlighting
  • target functions and classes following
  • advanced refactoring options (like renaming classes, functions, etc)
  • Search capabilities in source files.
  • Repository updates checking
  • Type hierarchy navigation with a click
  • And lots more!

With all these, yet, while the project contains a few thousand source files, I was able to add *all* files and parse them with Qt using a few CMake lines. And it was fast enough to handle all that! How to do it? How to add all these files in one step? CMake supports recursive adding of source files. Consider the following CMake file (always called CMakeLists.txt):

cmake_minimum_required(VERSION 3.0)
PROJECT(MyProject)

file(GLOB_RECURSE MySrcFiles
 "${CMAKE_SOURCE_DIR}/src/*.cpp"
 "${CMAKE_SOURCE_DIR}/src/*.h"
 )

add_library(MySrcFilesLib
 ${MySrcFiles}
 )

add_executable(MyExecutable main.cpp)

target_link_libraries(MyExecutable MySrcFilesLib)

The first two lines are obvious. The "file" part recursively finds all the files under the directory mentioned and saves them in the variable ${MySrcFiles}. The variable ${CMAKE_SOURCE_DIR} is basically the directory where you cmake file "CMakeLists.txt" is located. Feel free to set any directory you find fit. The "add_library" part creates a library from the source (and header) files saved in ${MySrcFiles}. The "add_executable" part  "creates" the executable, which is then linked to the libraries you added. That last linking part is not necessary if you don't want to build in Qt Creator. With such a simple CMake file, Qt Creator was smart enough to add all the source files, parse them, and give me all the functionality I needed to edit that project successfully.
SSH proxy with Putty that reconnects automatically

Introduction

Putty can be used to tunnel your connection through your SSH server. It creates a SOCKS proxy that you can use anywhere. The annoying part there is that if Putty disconnects for any reason, you'll have to reestablish the connection manually. If you're happy reconnecting putty manually all the time, then this article is not for you. Otherwise, keep reading to see how I managed to find a fair solution to this problem.

Ingredients

For this recipe, you need the following

  1. Putty, of course. You could use "Putty Tray", which supports being minimized to taskbar.
  2. Python 3

I understand that you may not have or use Python, but the solution I used depends on it, unfortunately. You could download Miniconda 3,  which is a smaller version of Anaconda 3. Anaconda is my recommended Python release.

How does this work in a nutshell?

The idea is very simple.

  1. Create a Putty session configuration that suites you
  2. Configure the session to close on disconnect
  3. Create a script that will relaunch your putty session on exit
  4. Make sure that the launcher you're gonna use doesn't keep a command prompt window open (which is why I'm using Python; pythonw.exe solves this issue).

Configuring Putty

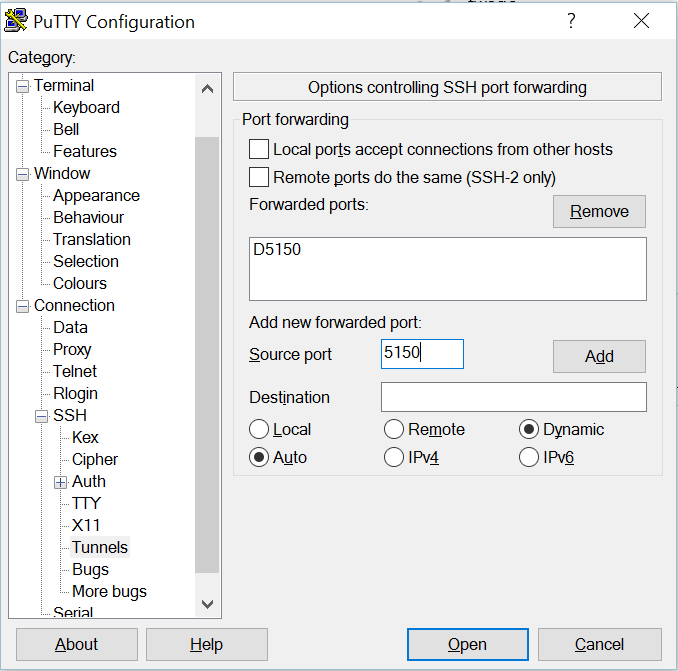
To create a putty tunnel proxy, load your favorite session configuration, and then go to the tunnels configuration, and use the following settings, assuming you want the SOCKS proxy port to be 5150. Choose any port you like.

PuttySOCKS

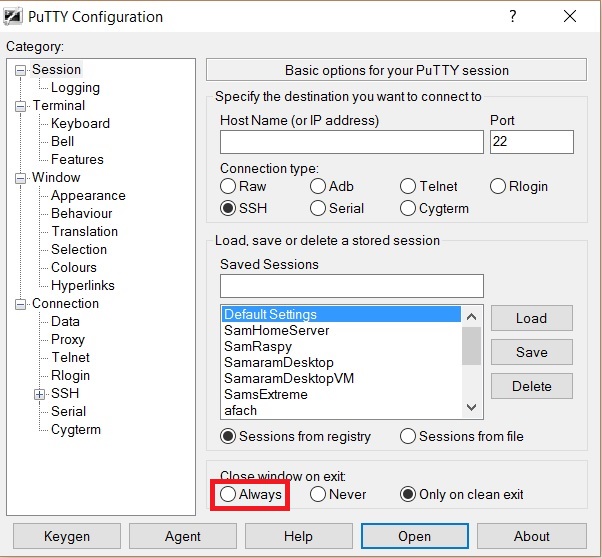
After connecting with this configuration, this creates a SOCKS that you can connect to with the loopback IP-Address, 127.0.0.1 at port 5150. One more important thing to configure in putty, is to set putty to exit on failure. This is important because we're gonna set putty to reconnect through a program that detects that it exited to start it again.

PuttySessions

Configuring Python and the launch script

Assuming you installed Python 3 and included in your PATH, now you have to install a package called tendo. This package is used to prevent running multiple instances of the program. To install it, first, run the command prompt of Windows (in case Python is installed directly on the system drive, C:, you have to run it as administrator). In the command prompt, to ensure that Python is working fine, run:

python -V

If this responds with no error and gives a message like:

Python 3.5.1 :: Anaconda 4.1.0 (32-bit)

Then you're good to go! Otherwise, make sure that Python is added to PATH, and try again. To install tendo, simply run in command prompt

pip install tendo

After that, in the directory of putty, write this script to a file:

import subprocess
from tendo import singleton
import time

me = singleton.SingleInstance() #exits if another instance exists

while True:
 print("Starting putty session...")
 subprocess.call('"putty.exe" -load "mysession"')
 print("Putty session closed... restarting...")
 time.sleep(5)   #sleep to avoid infinitely fast restarting if no connection is present

The name "mysession" is the name of your session in putty. Replace it with your session name. This script simply checks first that the current instance is the only instance, and then runs an infinite loop that keeps running the program every time it exits. So we made putty exit on disconnect, and this program will just run infinitely Save this script to some file like "MyLoop.pyw".

Testing the loop

Python has two executables. First is "python.exe", and the other one is "pythonw.exe". The difference is quite simple. The first one, "python.exe", runs your script as a terminal program. The second one, "pythonw.exe", runs your script without a terminal. It's designed for GUI applications. Now "python.exe" is not what we need, but it still is useful for debugging the script. So whenever you have a problem or when you want to run this for the first time, switch to/use "python.exe". Once you're done and everything looks fine, switch to "pythonw.exe".

Final step: The execution shortcut

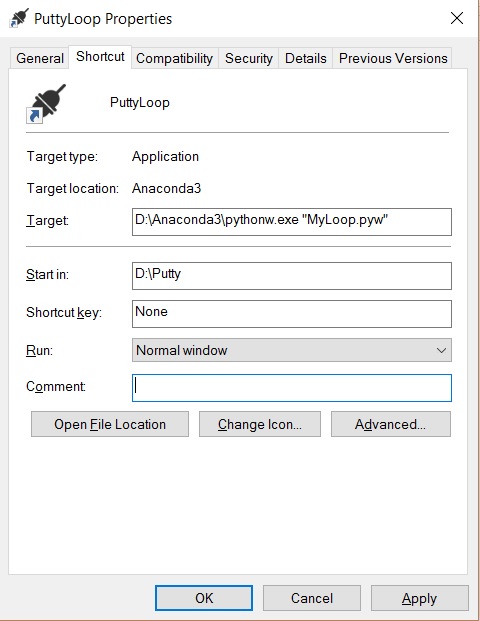
This is not necessary, but it makes things easy. It makes it easy to control whether you want to use "python.exe" or "pythonw". It makes it also possible to make your script handy. Simple create a shortcut to "python.exe" or "pythonw.exe", and the first command line parameter should be your script. Remember that "Start in" has to be the directory, where Putty is located. Following picture is an example of how that shortcut should look like.

PuttyLoopShortcut

And you're good to go! Start with "python.exe", and once it works, and you find that every time you exit putty or a disconnection happens it relaunches it, switch to "pythone.exe", and you're done.

Final notes

This is not a super-fancy solution. This is a solution that'll get you through and get the job done. If you want to exit the looping script, you'll have to kill Python from your task-manager. You may create a fancy taskbar app that'll do the looping and exits, which I would've done if I had the time. So please share it if you do! You can use PyQt or PySide for that.

Conclusion

With this, you'll keep reconnecting on disconnect, and you can get all your software to use your ssh server as a SOCKS proxy. Cheers!

Tunnel through https to your ssh server, and bypass all firewalls - The perfect tunnel! (HAProxy + socat)

Disclaimer

Perhaps there's no way to emphasize this more, but I don't encourage violation of corporate policy. I do this stuff for fun, as I love programming and I love automating my life and gaining more convenience and control with technology. I'm not responsible for any problem you might get with your boss in your job for using this against your company's firewall, or any similar problem for that matter.

Introduction

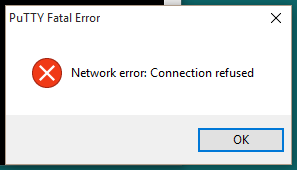
I was in a hotel in Hannover, when I tried to access my server's ssh. My ssh client, Putty, gave this disappointing message

PuttyConnectionRefused

At first I got scared as I thought my server is down, but then I visited the websites of that server, and they were fine. After some investigation, I found that my hotel blocks any access to many ports, including port 22, i.e., ssh. Did this mean that I won't have access to my server during my trip? Not really! I assume you're using a Windows client, but in case you're using linux, the changes you have to do are minimal, and I provide side-by-side how to do the same on a linux client. Let me know if you have a problem with any of this.

Tunneling mechanism, and problems with other methods that are already available

There are software that does something similar for you automatically, like sslh, but there's a problem there.

What does sslh do?

When you install sslh on your server, you choose, for example, port 443 for it. Port 443 is normally for http-ssl (https), that's normally taken by your webserver. So you change also your webserver's port to some arbitrary port, say 22443. Then, say you want to connect to that server: sslh analyzes and detects whether the incoming network packets are ssh or http. If the packets are ssh, it forwards them to port 22. If the packets looks like https, it forwards them to the dummy port you chose, which is 22443 as we assumed.

What's the problem with sslh, and similar programs?

It all depends on how sophisticated the firewall you're fighting is. Some firewalls are mediocre, and they just blindly open port 443, and you can do your sslh trick there and everything will work fine. But smart firewalls are not that dull; they analyze your packets and then judge whether you're allowed to be connected. Hence, a smart firewall will detect that you're trying to tunnel ssh, and will stop you!

How do we solve this problem?

The solution is: Masquerade the ssh packets inside an https connection, hence, the firewall will have to do a man-in-the-middle attack in order to know what you're trying to do. This will never happen! Hence, I call this solution: "The perfect solution".

How to create the tunnel?

I use HAProxy for this purpose. You need that on your server. It's available in standard linux systems. In Debian and Ubuntu, you can install it using

sudo apt-get install haproxy

You will need "socat" on your client to connect to this tunnel. This comes later after setting up HAProxy.

How does HAProxy work?

I don't have a PhD in HAProxy, it's fairly a complicated program that can be used for many purposes, including load balancing and simple internal proxying between different ports, and I use it only for this purpose. Let me give a brief explanation on how it works. HAProxy uses the model of frontends and backends. A frontend is what a client sees. You set a port there, and a communication mode (tcp, for example). You tell also a frontend "where these packets should go", based on some conditions (called ACL, Access Control Lists). You choose to which backend the packets have to go. The backend contains information about the target local port. So in short words, you tell HAProxy where to forward these packets from the frontend to the backend based on some conditions.

A little complication if you use https websites on the same server

If you use https webserver on the same machine, you'll have a problem. The problem is that you'll need to check whether the packets are ssh before decrypting them, because once you decrypt them, you can't use them as non-encrypted again (hence haproxy doesn't support forking encrypted and decrypted packets side-by-side). This is because you choose to decrypt in your frontend. That's why we use SNI (Server Name Indication) and do a trick:

  • If there's no SNI (no server name, just IP address), then forward to ssh
  • If server name used is ssh.example.com (some subdomain you choose), then forward to ssh (optional)
  • If anything else is the case, forward to the https web server port

We also use 2-frontends. The first one is the main one, and the second is a dummy frontend, and is only used to decrypt the ssh connection's https masquerade. HAProxy decrypts only in frontends.

Let's do it!

The configuration file of HAProxy in Debian/Ubuntu is

/etc/haproxy/haproxy.cfg

You could use nano, vi or vim to edit it (you definitely have to be root or use sudo). For example:

sudo nano /etc/haproxy/haproxy.cfg
Assumptions
  1. Your main https port is 443
  2. Your main ssh port is 22
  3. Your https webserver is now on 22443
  4. The dummy ssh port is 22222 (used just for decryption, it doesn't matter what you put it)
Main frontend

This is the frontend that will take care of the main port (supposedly 443). Everything after a sharp sign (#) on a line is a comment.

#here's a definition of a frontend. You always give frontends and backends a name
frontend TheMainSSLPort
 mode tcp
 option tcplog
 bind 0.0.0.0:443 #listen to port 443 under all ip-addresses

 timeout client 5h #timeout is quite important, so that you don't get disconnected on idle
 option clitcpka

 tcp-request inspect-delay 5s
 tcp-request content accept if { req_ssl_hello_type 1 }

 #here you define the backend you wanna use. The second parameter is the backend name
 use_backend sshDecrypt if !{ req_ssl_sni -m found } #if no SNI is given, then go to SSH
 use_backend sshDecrypt if { req_ssl_sni -i ssh.exmple.com } #if SNI is ssh.example.com, also go to ssh

default_backend sslWebServerPort #if none of the above apply, then this is https

In the previous configuration, we have two paths for the packets, i.e., two backends:

  1. If the connection is ssh, the backend named "sshDecrypt" will be used.
  2. If the connection is https, the backend named "sslWebServerPort" will be used.
The https backend

I put this here first because it's easier. All you have to do here is forward the packets to your webserver's port, which we assumed to be port 22433. The following is the relevant configuration:

backend sslWebServerPort
 mode tcp
 option tcplog
 server local_https_server 127.0.0.1:22443 #forward to this server, port 22443

Now the https part is done. Let's work on the ssh part.

The ssh front- and backends

We'll have to use a trick, as mentioned before, to get this to work. Once a judgment is done for packets to go to ssh (using SNI), the packets have to be decrypted. This is not possible in a backend, thus we use a backend to forward the packets to a dummy frontend that decrypts the packets, and then send these to another backend to send the packets to the ssh server.

backend sshToDecryptor
 mode tcp
 option tcplog
 server sshDecFrontend 127.0.0.1:22222
 timeout server 5h

This forwards the packets to port 22222. Now we build a frontend at that port that decrypts the packets.

frontend sshDecyprtionPort
 timeout client 5h
 option clitcpka

 bind 0.0.0.0:22222 ssl crt /path/to/combined/certs.pem no-sslv3
 mode tcp
 option tcplog

 tcp-request inspect-delay 5s
 tcp-request content accept if HTTP

default_backend sshServ #forward to the ssh server backend

The file /path/to/combined/certs.pem has to contain your private key, certificate and certificate chain in one file of your SSL. Concatenate them all in one file. Finally, the back end to the ssh server:

backend sshServ
 mode tcp
 option tcplog
 server sshServer1 127.0.0.1:22
 timeout server 5h

That's all you need to create the tunnel.

Test your haproxy configuration on the server

To test your configuration, stop HAProxy using

sudo service haproxy stop

and run the following command to start HAProxy in debug mode:

sudo haproxy -d -f /etc/haproxy/haproxy.cfg

The "-d" flag is debug mode, and the "-f" flag is used to choose the config file. The typical output looks like:

Available polling systems :
 epoll : pref=300, test result OK
 poll : pref=200, test result OK
 select : pref=150, test result FAILED
Total: 3 (2 usable), will use epoll.
Using epoll() as the polling mechanism.

If you don't get any errors, then your configuration is OK. Press ctrl+c to close this foreground version of HAProxy, and start the HAProxy service:

sudo service haproxy start
Test your tunnel from your client

To test your client, you can use OpenSSL. The following command will connect to the server.

openssl s_client -connect ssh.example.com:443

You can also use your IP address. This will connect to HAProxy, and will be interpreted as ssh, if your configuration is correct. Once it reaches the ssh server, you're good! You'll see lots of stuff from OpenSSL, and finally a few seconds later the following message will appear if you're using a Debian server:

SSH-2.0-OpenSSH_6.7p1 Debian-5+deb8u2

The message will change depending on your server's linux distribution and OpenSSH server version. Once you see this message, this shows that you reached your ssh server successfully. You now have to setup a connection to your server's tunnel.

Connecting to the ssh server using the tunnel

You need socat to connect to the https tunnel, and then you ssh to that tunnel. The program, socat, can be downloaded either as a zip package (please google it and try it, if it works, great. I had problem with OpenSSL dlls back then when I first tried this). Or you can use Cygwin to get it. Cygwin is a set of linux programs compiled for Windows. Don't get too confident in the installer and just download all its components or you'll easily consume 30 GB of diskspace and consume 10 hours installing these components. Just download what you need. In case you're using a linux client, socat is a standard program in linux. Just install it with your default package manager, e.g. in Debian/Ubuntu

sudo apt-get install socat
Running the socat tunnel

Open your Windows command prompt as administrator (or linux terminal), and use the following command to connect to your server using socat

socat -d TCP-LISTEN:8888,fork,range=127.0.0.1/32 OPENSSL-CONNECT:ssh.example.com:443,verify=0

Here we use port 8888 as an intermediate local port on your client. Once this works with no errors, you're good to use an ssh client. Warning: A "-v" flag is verbose for socat. Don't do this for serious connections, but only for tests, as it writes everything on the terminal where socat is running, and since Windows Command Prompt prints messages synchronously, it'll slow down everything for you.

Connect with your ssh client

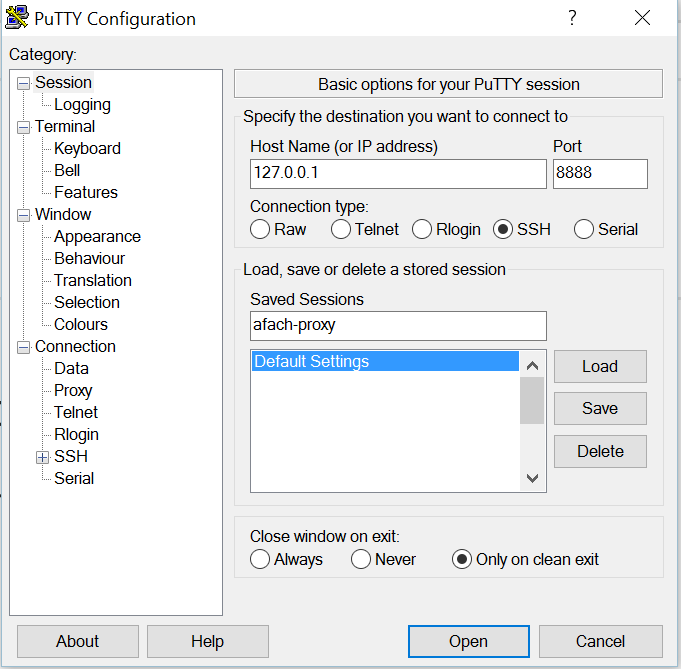
Assuming you're using putty, this is how your client should look like

PuttySSHTunnel

Or if you're using a linux client, simply use this in your terminal

ssh 127.0.0.1 -p 443

And you should connect, and you're done! Congratulations! You're connected to your ssh server through https.

What about the other ports, other than ssh?

Once you got ssh working, everything else is easy. You can use an ssh SOCKS proxy tunnel. Putty does this easily for you. All you have to do is configure your connection as in the picture:

PuttySOCKS

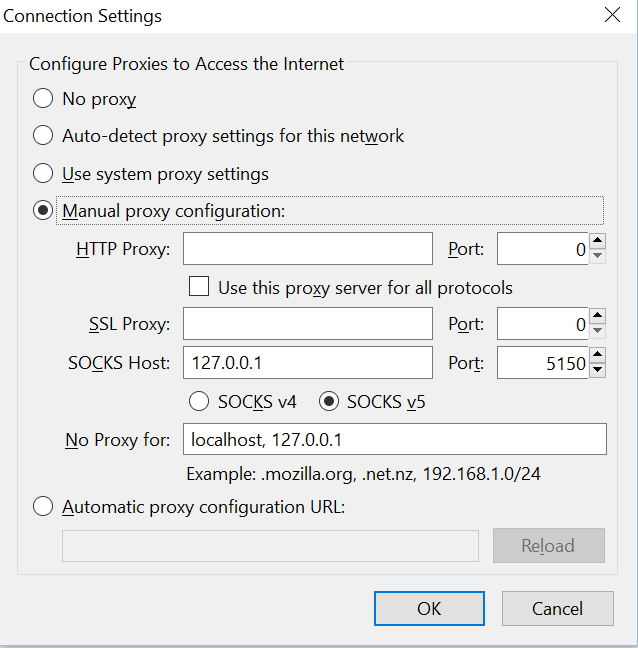
This creates a SOCKS proxy. To use it, I provide the following example that I do on Thunderbird to secure my e-mail connections. You can do the same on any program you like, even on your web browser:

SOCKSProxySettingsThunderbird

You can do the same on linux. Please google how to create an ssh tunnel on linux for SOCKS proxy.

Conclusion

You're connected! You can bypass any firewall you want just by being given access port 443. The only way to stop you is by cutting off your internet completely :-) Share this if you like it! I welcome your questions and any other thoughts in the comments.

Start your computer remotely using Raspberry Pi

Why do that?

I have my server at home, which contains multiple hard-drives with all my data on them in RAID configuration. I have my way to access this server remotely from any where in the world, but in order to access the server, it has to be turned on! So the problem is: How do I turn my server when I need it? This whole thing took me like 4 hours of work. It turns out it's much easier than it looks like.

Why is keeping the server turned on all the time a bad idea?

Of course, a web-server can be left turned on all the time to be accessed from everywhere at any time, but a server that is used to store data... I don't see why one would turn it on unless one needs something from it. In fact, I see the following disadvantages in keeping the server on all the time and benefits for being able to turn it on remotely:

  1. High power consumption... although the server I use is low-power, but why use 150 W all the time with no real benefit?
  2. Reduction of the server life-span, components like the processor has a mean life-time that will be consumed by continuous operation.
  3. Fans wear out and become noisier when used for longer times.
  4. What if the server froze? I should be able to restart it remotely.

What do you need to pull this off?

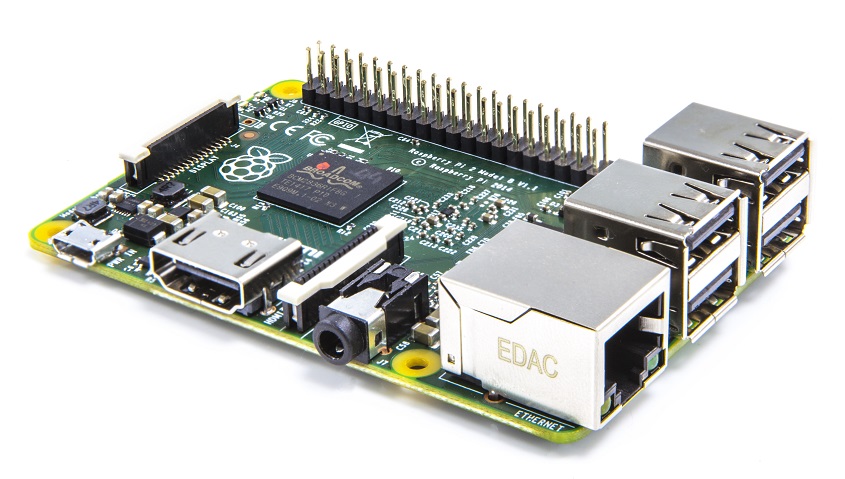
  • Raspberry Pi (1 or 2, doesn't matter, but I'll be discussing 2)

Pi2ModB1GB_-comp

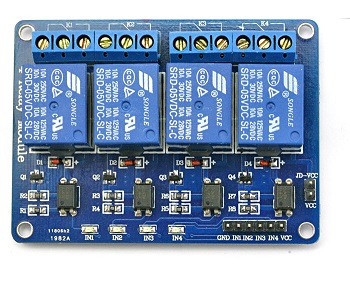
  • 5 Volts Relay. I use a 4 Channel relay module. It costs like $7 on eBay or Amazon depending on how many channels you need.

Relay5V-4Ch

  • Jumper cables (female-female specifically if you're using Raspberry Pi + a similar Relay Module) to connect the Raspberry Pi to the Relay Module

JumperCables

  • More wires and connectors to connect the server to the Raspberry Pi cleanly, without having a permanent long cord permanently connected to the server. I used scrap Molex 4-pin connectors:

MolexConnector

I cut a similar connector in half and used one part as a permanent connector to the server, and the other part went to the wire that goes to the Relay Module.

  • Finally, you need some expertise in Linux and SSH access as the operating system I use on my Raspberry Pi is Raspbian. This I can't teach here, unfortunately, as it's an extensive topic. Please learn how to access Raspberry Pi using SSH and how to install Raspbian. There are tons of tutorials for that online on the Raspbian and Raspberry websites that teach it extensively. If you're using Windows on your laptop/desktop to SSH to the Raspberry Pi, you can use Putty as an SSH client.

Once you're in the terminal of your Raspberry Pi, you're ready to go!

How control is done using Raspberry Pi:

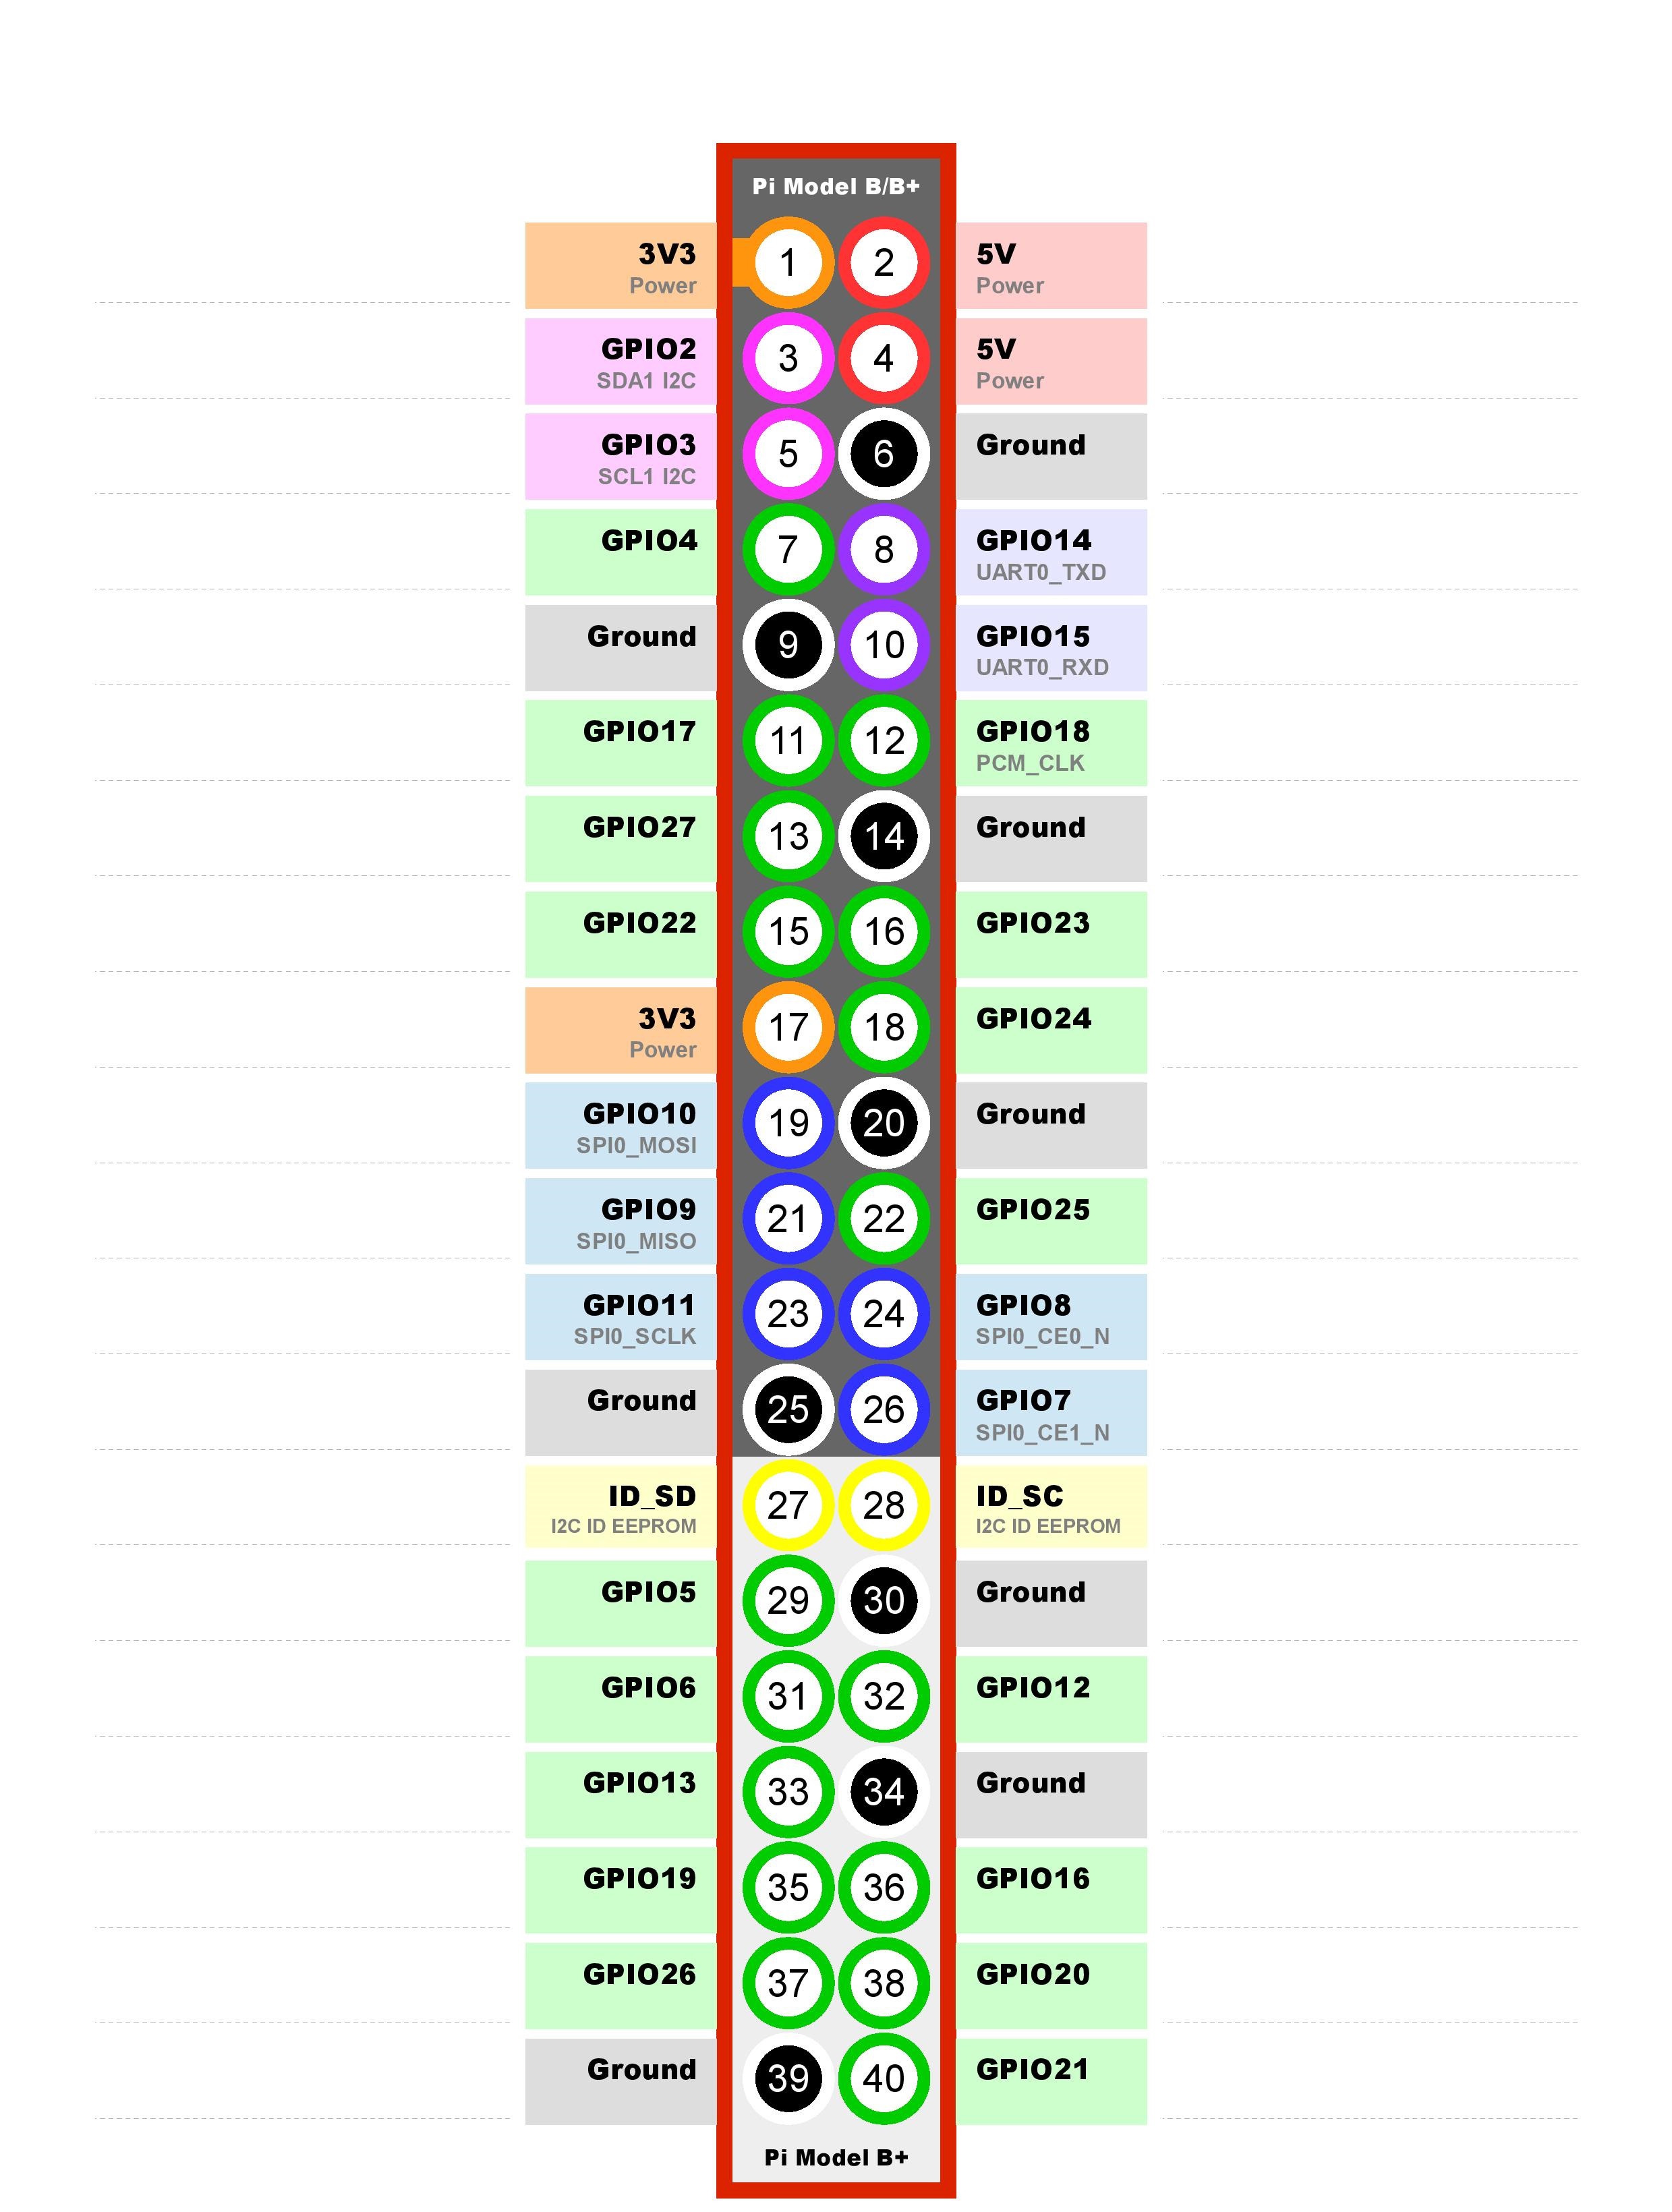
If you already know how to control Raspberry Pi 2 GPIO pins, you can skip this section. On Raspberry Pi 2, there is a set of 40 pins that contain 26 pins that are called GPIO (General Purpose Input/Output) pins. GPIO pins can be controlled from the operating system of Raspberry Pi. I use Raspbian as an operating system of my Raspberry Pi 2 and the Python scripting language. In Raspbian, python is pre-equipped with what's necessary to start controlling GPIO pins very easily. Why Python? Because it's super-easy and is very popular (it took me a few days to become very familiar with everything in that language... yes, it's that simple). Feel free to use anything else you find convenient for you. However, I provide here only Python scripts. The following is a map of these pins:

Raspberry-Pi-GPIO-Layout-Worksheet-page-001

  And the following is a video where I used them to control my 4-channel Relay Module:

And following is the Python script I used to do that. Lines that start with a sharp (#) are comments: Note 1: Be aware that indentation matters in Python for each line (that's how you identify scopes in Python). If you get an indent error when you run the script, that only means that the indentation of your script is not consistent. Read a little bit about indentation in Python if my wording for the issue isn't clear. Note 2: You MUST run this as super-user.

#!/usr/bin/python3

import RPi.GPIO as GPIO
import time

GPIO.setmode(GPIO.BCM)

#The following is a function that inverts the current pin value and saves the new state
def switchPortState(portMapElement):
    GPIO.output(portMapElement[0],not portMapElement[1])
    pe = [portMapElement[0],not portMapElement[1]]
    return pe


#There's no easy way to know the current binary state of a pin (on/off, or 1/0, or True/False), so I use this structure, which is a dictionary array that goes from up to the number of channels one wants to control (I used GPIO channels 2,3,5,6). The first element of each element is the GPIO port number, and the second element is the assumed initial condition. The latter will invert in each step as in the video
portMap = {}
portMap[0] = [2,False]
portMap[1] = [3,False]
portMap[2] = [5,False]
portMap[3] = [6,False]

for i in range(len(portMap)):
    GPIO.setup(portMap[i][0], GPIO.OUT)

while True:
    for i in range(len(portMap)):
    portMap[i] = switchPortState(portMap[i])
    time.sleep(0.5)

If you access your Raspberry Pi using SSH, then you can use "nano" as an easy text editor to paste this script. Say if you wanna call the script file "script.py", then:

nano script.py

will open a text editor where you can paste this script. After you're done, press Ctrl+X to exit and choose to save your script. Then make this script executable (linux thing), using:

chmod +x script.py

then run the script using

sudo ./script.py

This will start the script and the leds will flash every half a second. Again, we're using "sudo" because we can only control Raspberry Pi's GPIO pins as super user. There are ways to avoid putting your password each time you wanna run this, which will be explained later.

Get a grasp on the concept of turning the computer on/off:

There are two ways to turn your computer on/off electronically without using the switch and without depending on the bios (LAN wake-up, etc...):

  1. If you're lucky, the power button's wires will be exposed and you can immediately make a new connection branch in the middle and lead it outside the computer. Shorting the wires is equivalent to pressing the power button.
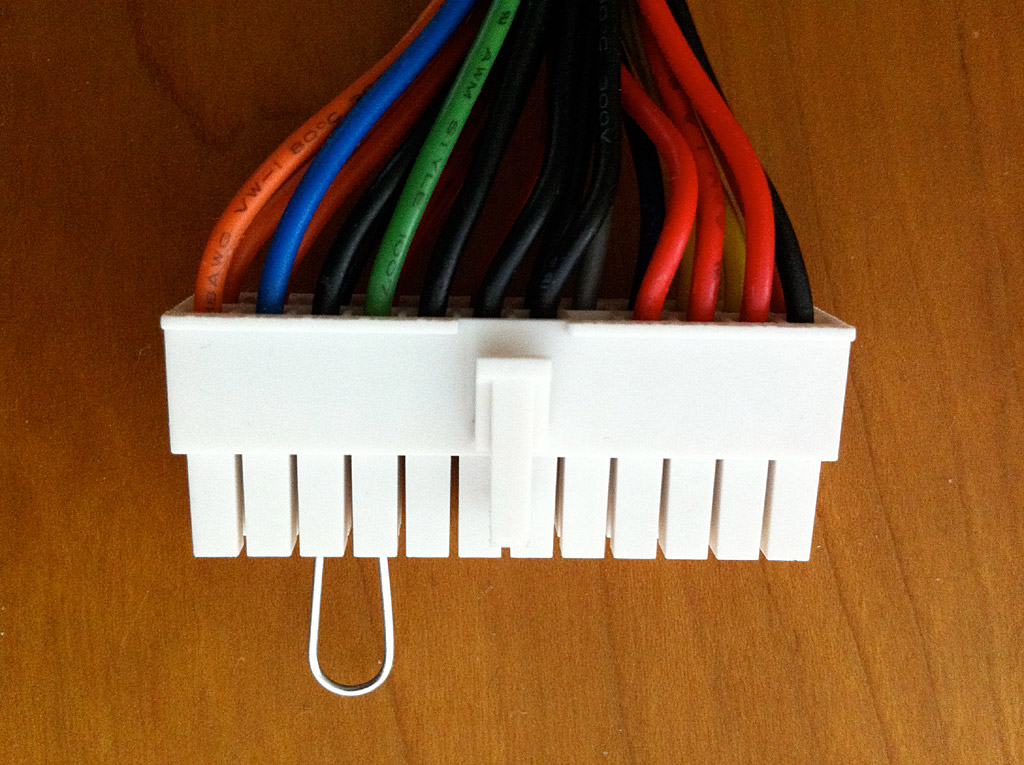
  2. Use the power supply's motherboard green wire. Shorting this wire to ground (to any black wire) will jump the computer and start it.

The following is a random picture for a computer power supply. A clip is used to short green with ground.

ATX-Power-Supply-Connector

I used the first way of the two ways I mentioned. Here's a video showing how it looks like:

So shorting these two wires that come from the power button for some time (half a second) is what I did and that works as being equivalent to pressing the power button. After you manage how to connect these, then you can go to the next step.

Connecting the power-wires to the Relay Module:

After learning how to control the Relay Module, and learning how to take a branch from the computer case that if you would short the computer starts, the remaining part is to connect the power-wires, that you got from your computer power button or green+black power supply cords, and connect them to the Relay Module. The following video shows the concept and the result.

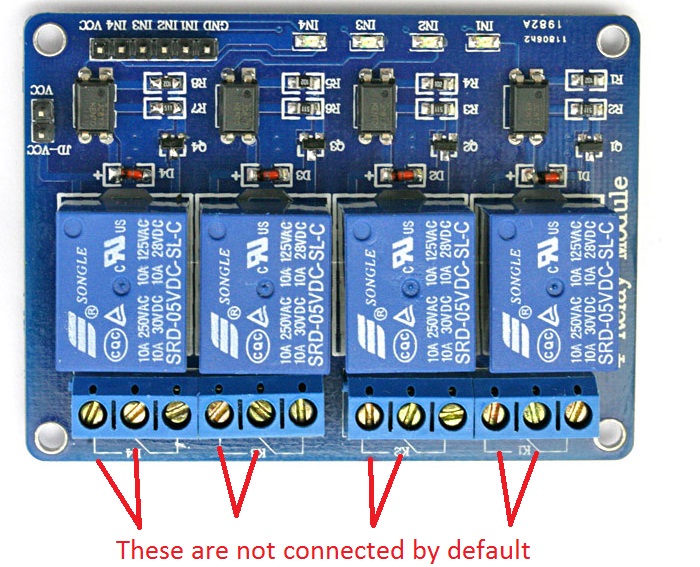
Now you have the two terminals that if you short together the computer starts, let's get into a little more details. Important: One important thing to keep in mind when doing the wire connection to the Relay Module, is that we need to connect them in a way that does not trigger the power switch if the Raspberry Pi is restarted. Therefore, choose the terminal connections to be disconnected by default, as the following picture shows:

Relay5V-4Ch-defaults

  Connect your power-wires two terminals to any of the marked two in the picture. The way the Relay Module works is that when it's turned off, it switches whether the middle terminal is connected to left or right. By default it's connected to right, and that's what we can see in the small schematic under the terminals. After doing the connections properly, now you can use the following script turn your computer on:

#!/usr/bin/python3

import RPi.GPIO as GPIO
import time
import argparse

#initialize GPIO pins
GPIO.setmode(GPIO.BCM)

#use command line arguments parser to decide whether switching should be long or short
#The default port I use here is 6. You can change it to whatever you're using to control your computer.
parser = argparse.ArgumentParser()
parser.add_argument("-port", "--portnumber", dest = "port", default = "6", help="Port number on GPIO of Raspberry Pi")
#This option can be either long or short. Short is for normal computer turning on and off, and long is for if the computer froze.
parser.add_argument("-len","--len", dest = "length", default = "short" , help = "Length of the switching, long or short")

args = parser.parse_args()

#initialize the port that you'll use
GPIO.setup(int(args.port), GPIO.OUT)


#switch relay state, wait some time (long or short) then switch it back. This acts like pressing the switch button.
GPIO.output(int(args.port),False)
if args.length == "long":
    time.sleep(8)
elif args.length == "short":
    time.sleep(0.5)
else:
    print("Error: parameter -len can be only long or short")
GPIO.output(int(args.port),True)

Save this script as, say, "switch.py", and make it executable as we did before:

chmod +x switch.py

Now you can test running this script, and this is supposed to start your computer!

sudo ./switch.py

Running the program from a web browser

You could be already satisfied by accessing switching the computer remotely using ssh, but I made the process a little bit fancier using a php webpage.

CAVEAT:

Here, I explain how you could get the job done to have a webpage that turns on/off your computer. I don't focus on security. Be careful not to make your home/work network's components accessible to the public. Please consult some expert to verify that what you're doing is acceptable and does not create a security threat for others' data.

Using superuser's sudo without having to put the password everytime

In order to access this from the web, you have to change pins states without having to enter the password. To do this, run the command

sudo visudo

This will open a text editor. If your username for Raspberry Pi's linux is myuser, then add the following lines there in that file:

www-data ALL=(myuser) NOPASSWD: ALL
myuser ALL=(ALL) NOPASSWD: ALL

This will allow the Apache user to execute the sudo command as you, and you have absolute super-user power. Now notice that this is not the best solution from a security point of view, but it just works. The best solution is to allow the user www-data to run a specific command as root. Just replace the last "ALL" of www-data with a comma separated list of the commands you wanna allow www-data to run, and replace "myuser" between the parenthesis with "root". I recommend you do that after having succeeded, to minimize the possible mistakes you could do. This is a legitimate development technique, we start with something less perfect, test it, then perfect it one piece at a time.

Installing Apache web-server

First, install the web-server on your Raspberry Pi. Do this by running this set of commands in your terminal:

sudo apt-get install apache2
sudo apt-get install php5
sudo apt-get install libapache2-mod-php5
sudo a2enmod php5
sudo a2enmod alias
sudo service apache2 restart

I hope I haven't forgotten any more necessary components, but there are, too, many tutorials out there and forums discussing how to start an apache webserver. If the apache installation is a success, then you could go to your web-browser and see whether it's working. First, get the hostname of your Raspberry Pi by running this command in Raspberry Pi's terminal

hostname

Let's say your hostname is "myhostname". Now go to your browser, and enter this address:

http://myhostname/

If this gives you a webpage, then the web-server is working fine and you can proceed. Otherwise, if the browser gives an error, you have to debug your web-server and get it working. Please consult some tutorial online to help you run the apache server.

Creating the webpage:

The default directory where the main webpage is stored in apache is either "/var/www/" or "/var/www/html/". Check where the index.html that you saw is, and place the new php file there. Say that php file has the name "control.php", and say the default directory is "/var/www/". Then, go to that directory using

cd /var/www/

Now create the new php page using the command

sudo nano control.php

And use the script

<!DOCTYPE html>
<html>
    <head>
        <title>Control page</title>
    </head>
    <body>
        <form action="#" method="post">
            <center>
                <select name="switchlen">
                    <option value="short">Short</option>
                    <option value="long">Long</option>
                </select>
                <input type="submit" value="Switch server" name="submit">
            </center>
        </form>

        <?php
        if(isset($_POST['submit']))
        {
            if($_POST['switchlen'] == "long")
            {
                echo("This is long");
                echo("<br>");
                $command = "sudo -u myuser sudo /usr/bin/python3 /home/myuser/switch.py -len long > debug.log 2>&1";
            }
            else if($_POST['switchlen'] == "short")
            {
                echo("This is short");
                echo("<br>");
                $command = "sudo -u myuser sudo /usr/bin/python3 /home/myuser/switch.py -len short > debug.log 2>&1";
            }
            $output = shell_exec($command);
            echo("Script return: ");
            var_dump($output);
        }
        ?>
    </body>
</html>

Don't forget to change the path of the script to the correct path of your script "switch.py", and change "myuser" to the username you're using in your Raspberry Pi. After you're done, press Ctrl+X to save and exit. To use this page and have it successfully run the script, you have to do one more thing, which is making apache's user own this file. The username for the apache web-server is called "www-data", so assuming you called the file "control.php", you have to run this command:

sudo chown www-data:www-data control.php

After you run this command, you should use "sudo nano" to edit this file instead of only nano, since your linux user doesn't own the file anymore. Also, don't save the file in any place other than the original folder of apache (like /var/www), at least not before you make sure it works. Adding new folders that apache recognizes is something that requires additional steps that I don't discuss here. Please consult an apache tutorial for that. To test the new php page, go to the link:

http://myhostname/control.php

If the website doesn't work, check the the file "debug.log" in the same path of control.php. It will tell you what was wrong in the script.

Controlling your computer from outside your home

If you're in a home network, then you can only access that webpage from within the network. If you would like to access it from outside the network, you have to have VPN access to your home network. Consider achieving this using OpenVPN. That's how I do it. I may write an article about it some time in the future.

Conclusion

I hope this article has given you an idea on how to control your appliances using Raspberry Pi. We have shown how to turn a computer on/off remotely. I do this for fun, but also more professional tasks can be achieved using similar scripts, such as controlling scientific experiments.

Designing high magnetic field coils efficiently

It sounds simple, I agree. But the problem is like designing a car. You could simply put some wheels together with simple set of chains and create a "car" that moves in your front lawn. But then if you want to design a professional car, you'll spend much more time and professionalism to do it. And if you wanna build a sports car, you'll have to fine tune every single parameter of your components to push the edge of what you can achieve. This story doesn't apply only to coils, but everything you design (actually I learned it from a book called "Professional C++" in a chapter discussing efficiency of algorithm writing, it's not far from this case). Concerning coils, if you just want to generate a few micro Tesla with no concerns about the homogeneity for the coil you're designing, then it doesn't matter how you do it. You could just wind a bunch of wires on your hand and your done. Today I'm not talking about such a thing. Today I'm gonna talk about coils that you want to use to generate relatively huge fields, with reasonable homogeneity. For such specifications, if you're careless about the details, you may end up wasting lots of time for experimental experience and money for cooling and power supplies. If you plan it carefully, you'll save lots of money.

Parameters of the system

Any coils you design to generate magnetic fields will have a set of parameters that you have to tune. From those parameters I mention: • Dimensions and geometry of the coils • Magnetic field to be generated • Thickness of the wires to be used

Where to start

The first thing one should determine for a coil system is the geometry of the coils. This is because the purpose of the coils is not just to generate a field, period. But it's to generate a field over some region that is well defined for a specific experiment. One should know in advance what sample will be exposed to the magnetic field. If you don't know that, you could spend days working on your coils, and eventually find out that your coils don't fit your sample, or that your coils are so huge that you're wasting so much power to generate fields you don't need (math will show how important the size of your coils vs power is). Therefore, start by defining the geometry of your coils. Once you know some characteristic radius or length of your coils, you have one step done. One more thing to pre-define, is how much wiring volume you want to use. Optimum coil thickness Any person starting with designing coils will have this question in mind: What's the optimum wire thickness that should be used to have the optimum magnetic field. Guess what? If you know how much wire-volume you will use, then it doesn't matter at all. Let's do the math to verify this. Suppose you have a slot to wind your wires that have a diameter $d$, and the slot has width $w$ and height $h$, as the figure shows. How can we optimally fill your wires in it? The optimal way is what the figure shows; it's called “hexagonal packing”. This is in case we ignore third dimension's problems, such as diagonal wires in the slots. This is a good approximation if the wires are wound carefully.

Cross section of packed wires (or packed cylinders)

Notice that it's very important to have a high number of circles per direction. This is to make sure that the flow of the current will be homogeneous in the volume. Imagine the opposite case, if you have one circle with diameter $d=h$. This will modify the magnetic field you expect from the wire as all the calculations of the magnetic field from a wire assume an infinitesimally thin wire. With that said, let's calculate the magnetic field from such a configuration. Any magnetic field generated from a current has the following form using the Biot-Savart law or Ampere's law: $$B=U\left(r\right)\cdot n\cdot I,$$ where $U\left(r\right)$ is a coefficient that depends on the dimensions of the coils with radius $r$, and $I$ is the electrical current, and $n$ is the number of total turns of the coil. We assumed that we know the geometry of your coil, meaning that $U\left(r\right)$ is fixed before starting this calculation. Let's see how the wire diameter will modify your magnetic field. From the definition of resistivity of a wire, we have $$R=\rho\frac{\ell}{A}=\rho\frac{4\ell}{\pi d^{2}},$$ where R is the resistance of the wire, $\ell$ is its length, $A=\pi\left(\frac{d} {2}\right)^{2}$ is its cross sectional area and $\rho$ is its resistivity. On the other hand, the power to be exerted on the coil is given by the formula $$P=I^{2}R\quad\rightrightarrows \quad I=\sqrt{\frac{P}{R}},$$ and from the resistivity formula $$I=\sqrt{\frac{P}{R}}=\frac{d}{2}\sqrt{\frac{\pi P}{\rho\ell}},$$ and we can put this in a form proportional to the magnetic field $$B\propto n\cdot I=n\frac{d}{2}\sqrt{\frac{\pi P}{\rho\ell}}$$ There's still one more question remaining to settle this; what's the length of the wire required? The length of the wire depends on the diameter of the wire that will be used, since a thicker wire will occupy the area of the slot faster. Whether you wind your wire on a circle or a square, the length of the wire used will depend linearly on the side length or diameter of that geometry. If we call that $r$, then the length of the wire going to be $\ell=n\cdot k\cdot r$, where $k$ is $2\pi$ for a coil on the shape of a circle, and $4$ for a square coil, and $n$ is the number of turns. The formula of current then becomes: $$n\cdot I=n\frac{d}{2}\sqrt{\frac{\pi P}{\rho\ell}}=n\frac{d}{2}\sqrt{\frac{\pi P}{\rho n\cdot k\cdot r}}=\frac{d}{2}\sqrt{\frac{\pi nP}{\rho\cdot k\cdot r}}.$$ Finally, the number of turns can be seen as the number of circles stacked in a hexagonal packing (as shown in the figure of the hexagonal packing). The number of circles (or cylindrical wires) with diameter $d$ packed in a slot of width $w$ and height $h$ can be approximated assuming a high number of circles (cylinders) per direction $$n=\frac{w}{d}\cdot\frac{h}{d\cos30^{\circ}}=\frac{2}{\sqrt{3}}\frac{wh}{d^{2}},$$ where the factor $\cos30^{\circ}$ is simply due to the space saved with the hexagonal packing. In fact it doesn't matter what packing you choose, since all packings will depend inversely on $d^{2}$, which is the important part. With this, the current formula becomes: $$n\cdot I=\frac{d}{2}\sqrt{\frac{\pi nP}{\rho\cdot k\cdot r}}=\frac{1}{2}\sqrt{\frac{2\pi}{\sqrt{3}}}\sqrt{\frac{ whP}{\rho k r}}.$$ This result shows that the field doesn't depend on the wire that we choose or the current we use. The magnetic field depends only on the power if the geometry of the coil is fixed. One more important result here is that the power required is linearly proportional to $r$, which means that if your coils would have half the radius, half the power will be required. Thus it's considerably important to make the coils as small as possible.

How to choose the wire diameter?

Having the magnetic field not depend on the wire thickness doesn't mean we can choose it arbitrarily. In fact, the wire determines a very important characteristic, which is the voltage and amperage that we will need to generate. It doesn't make sense to make a coil that will require 150 amperes and 0.1 volts, and that's what the wire diameter determines for you. The thinner the wire is, the more resistance the coil will have, and thus more voltage will be required. Thus, to fine-tune the production of your coil, decide the diameter of the wire after choosing the power supply that has the appropriate voltage and amperage.

Conclusion

It's intuitive to think that the amount of current will tell how much field you'll get, this is from simple, classical electromagnetism. However, in reality, it doesn't really depend on the current. This is because the choice of the current depends on other parameters that are prioritized, such as the geometry of the coils. If the geometry of the coils is fixed, then it doesn't matter how much current you put, but what matters is practically how much power one will put in. This result is important for high field generators, since higher fields will entail higher power requirement, leading to heating problems. If your coils generate more heat that your system can dissipate, then it makes sense to think beforehand whether to whether the geometry should be made smaller or different, since smaller geometry means less power requirement.