
Disclaimer
Perhaps there’s no way to emphasize this more, but I don’t encourage violation of corporate policy. I do this stuff for fun, as I love programming and I love automating my life and gaining more convenience and control with technology. I’m not responsible for any problem you might get with your boss in your job for using this against your company’s firewall, or any similar problem for that matter.
Introduction
I was in a hotel in Hannover, when I tried to access my server’s ssh. My ssh client, Putty, gave this disappointing message
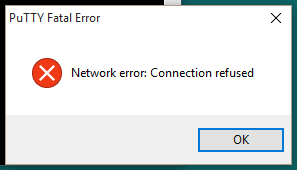
At first I got scared as I thought my server is down, but then I visited the websites of that server, and they were fine. After some investigation, I found that my hotel blocks any access to many ports, including port 22, i.e., ssh. Did this mean that I won’t have access to my server during my trip? Not really!
I assume you’re using a Windows client, but in case you’re using linux, the changes you have to do are minimal, and I provide side-by-side how to do the same on a linux client. Let me know if you have a problem with any of this.
Tunneling mechanism, and problems with other methods that are already available
There are software that does something similar for you automatically, like sslh, but there’s a problem there.
What does sslh do?
When you install sslh on your server, you choose, for example, port 443 for it. Port 443 is normally for http-ssl (https), that’s normally taken by your webserver. So you change also your webserver’s port to some arbitrary port, say 22443. Then, say you want to connect to that server: sslh analyzes and detects whether the incoming network packets are ssh or http. If the packets are ssh, it forwards them to port 22. If the packets looks like https, it forwards them to the dummy port you chose, which is 22443 as we assumed.
What’s the problem with sslh, and similar programs?
It all depends on how sophisticated the firewall you’re fighting is. Some firewalls are mediocre, and they just blindly open port 443, and you can do your sslh trick there and everything will work fine. But smart firewalls are not that dull; they analyze your packets and then judge whether you’re allowed to be connected. Hence, a smart firewall will detect that you’re trying to tunnel ssh, and will stop you!
How do we solve this problem?
The solution is: Masquerade the ssh packets inside an https connection, hence, the firewall will have to do a man-in-the-middle attack in order to know what you’re trying to do. This will never happen! Hence, I call this solution: “The perfect solution“.
How to create the tunnel?
I use HAProxy for this purpose. You need that on your server. It’s available in standard linux systems. In Debian and Ubuntu, you can install it using
sudo apt-get install haproxy
You will need “socat” on your client to connect to this tunnel. This comes later after setting up HAProxy.
How does HAProxy work?
I don’t have a PhD in HAProxy, it’s fairly a complicated program that can be used for many purposes, including load balancing and simple internal proxying between different ports, and I use it only for this purpose. Let me give a brief explanation on how it works. HAProxy uses the model of frontends and backends. A frontend is what a client sees. You set a port there, and a communication mode (tcp, for example). You tell also a frontend “where these packets should go”, based on some conditions (called ACL, Access Control Lists). You choose to which backend the packets have to go. The backend contains information about the target local port. So in short words, you tell HAProxy where to forward these packets from the frontend to the backend based on some conditions.
A little complication if you use https websites on the same server
If you use https webserver on the same machine, you’ll have a problem. The problem is that you’ll need to check whether the packets are ssh before decrypting them, because once you decrypt them, you can’t use them as non-encrypted again (hence haproxy doesn’t support forking encrypted and decrypted packets side-by-side). This is because you choose to decrypt in your frontend. That’s why we use SNI (Server Name Indication) and do a trick:
- If there’s no SNI (no server name, just IP address), then forward to ssh
- If server name used is ssh.example.com (some subdomain you choose), then forward to ssh (optional)
- If anything else is the case, forward to the https web server port
We also use 2-frontends. The first one is the main one, and the second is a dummy frontend, and is only used to decrypt the ssh connection’s https masquerade. HAProxy decrypts only in frontends.
Let’s do it!
The configuration file of HAProxy in Debian/Ubuntu is
/etc/haproxy/haproxy.cfg
You could use nano, vi or vim to edit it (you definitely have to be root or use sudo). For example:
sudo nano /etc/haproxy/haproxy.cfg
Assumptions
- Your main https port is 443
- Your main ssh port is 22
- Your https webserver is now on 22443
- The dummy ssh port is 22222 (used just for decryption, it doesn’t matter what you put it)
Main frontend
This is the frontend that will take care of the main port (supposedly 443). Everything after a sharp sign (#) on a line is a comment.
#here's a definition of a frontend. You always give frontends and backends a name
frontend TheMainSSLPort
 mode tcp
 option tcplog
 bind 0.0.0.0:443 #listen to port 443 under all ip-addresses

 timeout client 5h #timeout is quite important, so that you don't get disconnected on idle
 option clitcpka

 tcp-request inspect-delay 5s
 tcp-request content accept if { req_ssl_hello_type 1 }

 #here you define the backend you wanna use. The second parameter is the backend name
 use_backend sshDecrypt if !{ req_ssl_sni -m found } #if no SNI is given, then go to SSH
 use_backend sshDecrypt if { req_ssl_sni -i ssh.exmple.com } #if SNI is ssh.example.com, also go to ssh

default_backend sslWebServerPort #if none of the above apply, then this is https
In the previous configuration, we have two paths for the packets, i.e., two backends:
- If the connection is ssh, the backend named “sshDecrypt” will be used.
- If the connection is https, the backend named “sslWebServerPort” will be used.
The https backend
I put this here first because it’s easier. All you have to do here is forward the packets to your webserver’s port, which we assumed to be port 22433. The following is the relevant configuration:
backend sslWebServerPort
 mode tcp
 option tcplog
 server local_https_server 127.0.0.1:22443 #forward to this server, port 22443
Now the https part is done. Let’s work on the ssh part.
The ssh front- and backends
We’ll have to use a trick, as mentioned before, to get this to work. Once a judgment is done for packets to go to ssh (using SNI), the packets have to be decrypted. This is not possible in a backend, thus we use a backend to forward the packets to a dummy frontend that decrypts the packets, and then send these to another backend to send the packets to the ssh server.
backend sshToDecryptor
 mode tcp
 option tcplog
 server sshDecFrontend 127.0.0.1:22222
 timeout server 5h
This forwards the packets to port 22222. Now we build a frontend at that port that decrypts the packets.
frontend sshDecyprtionPort
 timeout client 5h
 option clitcpka

 bind 0.0.0.0:22222 ssl crt /path/to/combined/certs.pem no-sslv3
 mode tcp
 option tcplog

 tcp-request inspect-delay 5s
 tcp-request content accept if HTTP

default_backend sshServ #forward to the ssh server backend
The file /path/to/combined/certs.pem has to contain your private key, certificate and certificate chain in one file of your SSL. Concatenate them all in one file.
Finally, the back end to the ssh server:
backend sshServ
 mode tcp
 option tcplog
 server sshServer1 127.0.0.1:22
 timeout server 5h
That’s all you need to create the tunnel.
Test your haproxy configuration on the server
To test your configuration, stop HAProxy using
sudo service haproxy stop
and run the following command to start HAProxy in debug mode:
sudo haproxy -d -f /etc/haproxy/haproxy.cfg
The “-d” flag is debug mode, and the “-f” flag is used to choose the config file. The typical output looks like:
Available polling systems :
 epoll : pref=300, test result OK
 poll : pref=200, test result OK
 select : pref=150, test result FAILED
Total: 3 (2 usable), will use epoll.
Using epoll() as the polling mechanism.
If you don’t get any errors, then your configuration is OK. Press ctrl+c to close this foreground version of HAProxy, and start the HAProxy service:
sudo service haproxy start
Test your tunnel from your client
To test your client, you can use OpenSSL. The following command will connect to the server.
openssl s_client -connect ssh.example.com:443You can also use your IP address. This will connect to HAProxy, and will be interpreted as ssh, if your configuration is correct. Once it reaches the ssh server, you’re good! You’ll see lots of stuff from OpenSSL, and finally a few seconds later the following message will appear if you’re using a Debian server:
SSH-2.0-OpenSSH_6.7p1 Debian-5+deb8u2
The message will change depending on your server’s linux distribution and OpenSSH server version. Once you see this message, this shows that you reached your ssh server successfully. You now have to setup a connection to your server’s tunnel.
Connecting to the ssh server using the tunnel
You need socat to connect to the https tunnel, and then you ssh to that tunnel. The program, socat, can be downloaded either as a zip package (please google it and try it, if it works, great. I had problem with OpenSSL dlls back then when I first tried this). Or you can use Cygwin to get it. Cygwin is a set of linux programs compiled for Windows. Don’t get too confident in the installer and just download all its components or you’ll easily consume 30 GB of diskspace and consume 10 hours installing these components. Just download what you need.
In case you’re using a linux client, socat is a standard program in linux. Just install it with your default package manager, e.g. in Debian/Ubuntu
sudo apt-get install socat
Running the socat tunnel
Open your Windows command prompt as administrator (or linux terminal), and use the following command to connect to your server using socat
socat -d TCP-LISTEN:8888,fork,range=127.0.0.1/32 OPENSSL-CONNECT:ssh.example.com:443,verify=0
Here we use port 8888 as an intermediate local port on your client. Once this works with no errors, you’re good to use an ssh client.
Warning: A “-v” flag is verbose for socat. Don’t do this for serious connections, but only for tests, as it writes everything on the terminal where socat is running, and since Windows Command Prompt prints messages synchronously, it’ll slow down everything for you.
Connect with your ssh client
Assuming you’re using putty, this is how your client should look like
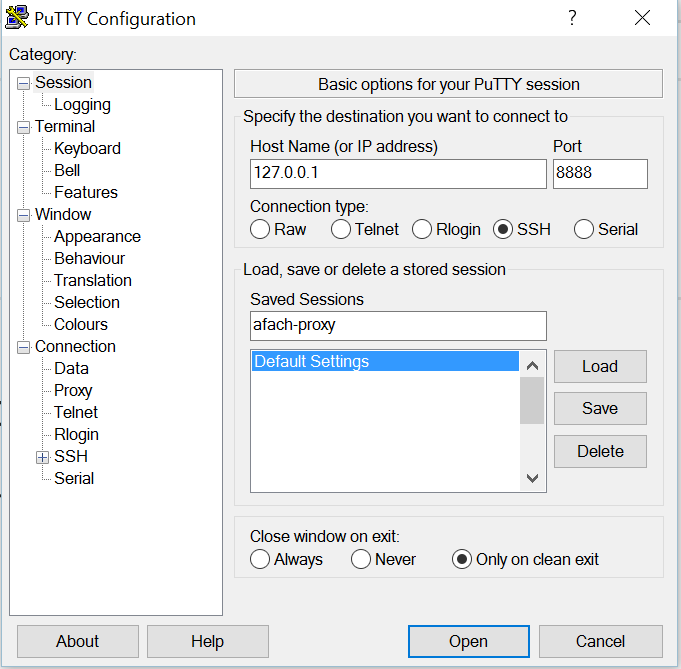
Or if you’re using a linux client, simply use this in your terminal
ssh 127.0.0.1 -p 443
And you should connect, and you’re done! Congratulations! You’re connected to your ssh server through https.
What about the other ports, other than ssh?
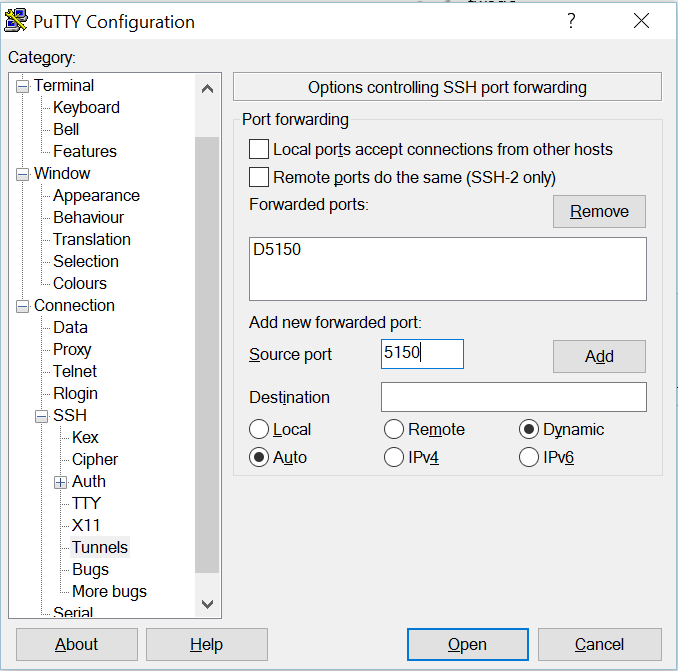
Once you got ssh working, everything else is easy. You can use an ssh SOCKS proxy tunnel. Putty does this easily for you. All you have to do is configure your connection as in the picture:
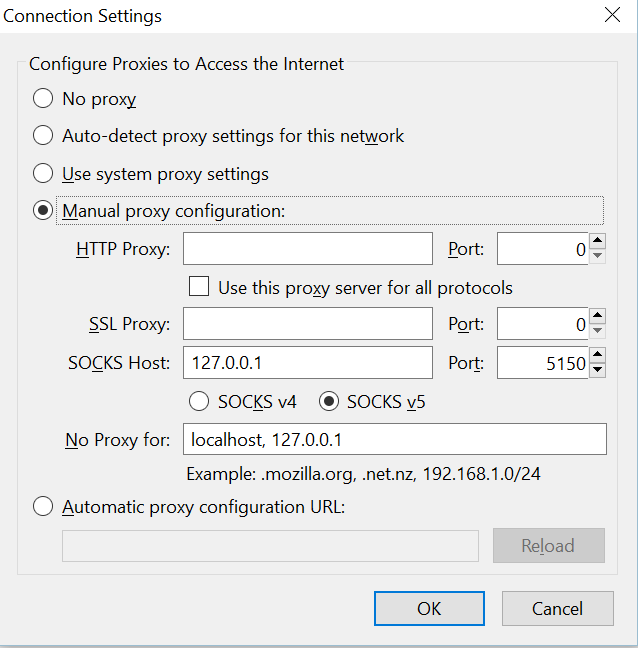
This creates a SOCKS proxy. To use it, I provide the following example that I do on Thunderbird to secure my e-mail connections. You can do the same on any program you like, even on your web browser:
You can do the same on linux. Please google how to create an ssh tunnel on linux for SOCKS proxy.
Conclusion
You’re connected! You can bypass any firewall you want just by being given access port 443. The only way to stop you is by cutting off your internet completely 🙂
Share this if you like it! I welcome your questions and any other thoughts in the comments.